Strobing is over. Now it's all about trumping. (From F-Comedy.)

Showing posts with label tutorial. Show all posts
Showing posts with label tutorial. Show all posts
Sunday, March 6, 2016

Thursday, November 19, 2015
Cheap trick: Winged eyeliner for (fairly) hooded eyes
Disclosure: Affiliate link.


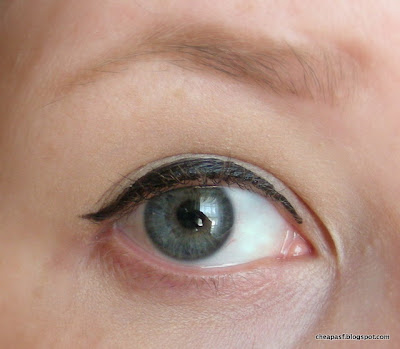
I love a good cat-eye look, but hooded lids can make certain types of eye makeup trickier. By hooded, I mean that the part of the eyelid below the eyebrow comes down to cover up most of the part of the eyelid that is below the crease/immediately above the lashes. My lids are fairly hooded now, and I am sure they are only going to become more so as I age. There's nothing wrong with this shape - lots of gorgeous people have hooded eyes (not that I am including myself in that category, but I don't consider my eye type a flaw). But this shape can be frustrating if you are pining after elaborate eyeshadow looks, because you know that most of the color will just disappear into the your crease. On the upside, it means that I can wear pretty garish eyeshadow in professional settings and no one will really notice. It also means that winged eyeliner is tricky, because my crease extends below the outer corner of my eye, which can interfere with the wing. Here's a creepy closeup up my eye so that you can see what I'm talking about:
I've heard a lot of people with eyes similar to mine in one way or another say that they can't do a cat eye, but I use an easy technique that might work for you too. This may also be useful even if your eyes aren't hooded, but you have the low crease thing going on like I do.
[ETA: After reading Michelle's comment below (thanks!), it occurred to me that I'd chosen a photo here where I'm raising my eyebrows a little (believe it or not) to show my eyeshadow better. Usually I raise my eyebrows like this and tilt my head to apply eye makeup, so that I can see my eyelid better. I've added another, no makeup (ungroomed brows), straight on shot of my eye that might make help to illustrate the shape better. You can see that when I relax my eyebrows, the hooded part is lower. ]

[ETA: After reading Michelle's comment below (thanks!), it occurred to me that I'd chosen a photo here where I'm raising my eyebrows a little (believe it or not) to show my eyeshadow better. Usually I raise my eyebrows like this and tilt my head to apply eye makeup, so that I can see my eyelid better. I've added another, no makeup (ungroomed brows), straight on shot of my eye that might make help to illustrate the shape better. You can see that when I relax my eyebrows, the hooded part is lower. ]

Most winged eyeliner tutorials (like this one, for example) tell you to start by drawing a short line angled upward from the corner of your eye, and then to line above your lashes and connect the two at the outer corner. Usually you're not going to want to stretch your eyelid while doing this, because when you let go of it, you'll end up with a different shape from what you originally drew.
You can see from the way my eyelid is shaped that if I try to do it that way, the crease (or creases, to be more accurate) will get in the way. I can't just draw a line over the crease without making a huge mess.
So here is my modification.
Friday, February 28, 2014
The quickest/laziest waves (in which I try out a hair tutorial from xoVain and it is actually useful)
Disclosure: This post contains an Amazon affiliate link.
I don't know why I sometimes feel compelled to read xoVain when it usually just fucking annoys me, but I do. A while back, however, I found something good there: a use for some of that "beach hair" spray, which had me pretty stumped (I got it as a sample from Ipsy), and the fastest and easiest way I've ever come across to add waves that will actually last to my normally stick-straight hair.
You can see the original article here, and my own version of it below as further illustration. I wanted to add to the information available on xoVain, because I think the article there doesn't emphasize some of the major advantages of this technique. But I also want to be clear that this isn't an original idea I came up with independently.
I've posted before about techniques for curls/waves that work for me. For whatever reason, the kind of hair that I have just does not respond to heat styling. I mean, okay, I can make it even straighter, but it rejects curling with heat, whether from a curling iron, hot rollers, or whatever. 20 minutes max after curling, it's straight again, regardless of temperature or product. So the best luck I've had in the past is with putting curlers in overnight. I still think doing it that way has the prettiest results, but this method from xoVain will also work when I want some extra texture in my hair, but I don't want to wash it and then wait 8 hours+. This takes half an hour tops, and most of that time you can spend doing something else.
So this method has the advantages of: (1) not requiring any heat; (2) not requiring wet hair; and (3) being really fucking simple and quick.
It does need a specific product, though, whereas you really don't need anything but water and some rags to curl your hair overnight. For this you need a surf/beach/salt spray. You can google recipes for making DIY versions, but I haven't tested any of those, so I can't tell you how well they work. The one I have is Healthy Sexy Hair Soy Renewal Beach Hair. I could not figure out what to do with this shit when I got it. The package says that you can just, "spray on to damp hair and let dry naturally or blow dry with a diffuser for all over texture." If by texture they mean making your hair feel somewhat rougher and crunchier than usual, then sure. But it didn't do anything else for me. It may be that to use it as instructed you have to have hair that is already prone to waviness or something.
But it works great for making waves with dry hair twisted into buns! It's not utterly pointless! (Also it smells like old school suntan lotion. Yum.) I can't think of another product that will work quite like this: dries/sets extremely quicky, not goopy or sticky, etc. All you do is spray it all over your dry hair, twist your hair into 2-3 buns, and wrap an elastic around each of them. Wait 15-20 minutes (maybe longer depending on how thick your hair is), and then finger comb the waves. I have photos of the steps below the cut. (I am not, in fact, naked in any of the photos. It's a beige cami, okay?)
I don't know why I sometimes feel compelled to read xoVain when it usually just fucking annoys me, but I do. A while back, however, I found something good there: a use for some of that "beach hair" spray, which had me pretty stumped (I got it as a sample from Ipsy), and the fastest and easiest way I've ever come across to add waves that will actually last to my normally stick-straight hair.
You can see the original article here, and my own version of it below as further illustration. I wanted to add to the information available on xoVain, because I think the article there doesn't emphasize some of the major advantages of this technique. But I also want to be clear that this isn't an original idea I came up with independently.
I've posted before about techniques for curls/waves that work for me. For whatever reason, the kind of hair that I have just does not respond to heat styling. I mean, okay, I can make it even straighter, but it rejects curling with heat, whether from a curling iron, hot rollers, or whatever. 20 minutes max after curling, it's straight again, regardless of temperature or product. So the best luck I've had in the past is with putting curlers in overnight. I still think doing it that way has the prettiest results, but this method from xoVain will also work when I want some extra texture in my hair, but I don't want to wash it and then wait 8 hours+. This takes half an hour tops, and most of that time you can spend doing something else.
So this method has the advantages of: (1) not requiring any heat; (2) not requiring wet hair; and (3) being really fucking simple and quick.
It does need a specific product, though, whereas you really don't need anything but water and some rags to curl your hair overnight. For this you need a surf/beach/salt spray. You can google recipes for making DIY versions, but I haven't tested any of those, so I can't tell you how well they work. The one I have is Healthy Sexy Hair Soy Renewal Beach Hair. I could not figure out what to do with this shit when I got it. The package says that you can just, "spray on to damp hair and let dry naturally or blow dry with a diffuser for all over texture." If by texture they mean making your hair feel somewhat rougher and crunchier than usual, then sure. But it didn't do anything else for me. It may be that to use it as instructed you have to have hair that is already prone to waviness or something.
But it works great for making waves with dry hair twisted into buns! It's not utterly pointless! (Also it smells like old school suntan lotion. Yum.) I can't think of another product that will work quite like this: dries/sets extremely quicky, not goopy or sticky, etc. All you do is spray it all over your dry hair, twist your hair into 2-3 buns, and wrap an elastic around each of them. Wait 15-20 minutes (maybe longer depending on how thick your hair is), and then finger comb the waves. I have photos of the steps below the cut. (I am not, in fact, naked in any of the photos. It's a beige cami, okay?)
Tuesday, November 26, 2013
"Stamping" mascara as eyeliner (a trick for those of us with limited eyelid real estate)
The Beauty Department is a great resource for makeup tricks. They make everything look so fucking pretty, though I've had some mixed results trying out their techniques myself. I'd say they work most of the time, but every once in a while there's a fail. Like this two-toned lip tutorial - I couldn't find any combination that didn't just look like the 90s dark lip liner thing. Even when the liner wasn't really darker than the gloss. Maybe that's why there's no full face image? And even though I do layer my skin care products like this, this post is rife with misinformation (the comments point out many of the problems).
One of the treasures I've discovered, however, is this technique of "stamping" mascara at the base of the lashes to basically do the job of eyeliner. I really don't have much eyelid to work with, so sometimes I have to choose between eyeliner and eyeshadow. With this trick, I can get the thickness and darkness of an eyeliner without taking up any extra space on my lid. Since it works so well, I thought I'd share my results.
It's not dramatic, but it definitely does make a difference. Another way to do this is to dot in between the lashes with eyeliner, but this is much faster and easier. All the instructions are at the link above, but you're not actually applying any product to your eyelid. You're just making the base of your lashes darker. You might end up with a little mascara transferring to the lower rim of your eye immediately after you do it, but that's pretty easy to just wipe away.
Here I used CoverGirl LashBlast Volume in Black-Brown for the first two coats and then Jordana Best Lash Extreme Volumizing Mascara (reviewed here) to stamp at the base. There's no real reason why you couldn't use the same mascara for both steps. I just like the separation I get from the CG one and the thickness of the Jordana one. And then I'm left my whole eyelid (what little there is) to play with eyeshadows.
One of the treasures I've discovered, however, is this technique of "stamping" mascara at the base of the lashes to basically do the job of eyeliner. I really don't have much eyelid to work with, so sometimes I have to choose between eyeliner and eyeshadow. With this trick, I can get the thickness and darkness of an eyeliner without taking up any extra space on my lid. Since it works so well, I thought I'd share my results.
 |
| Before and after stamping at the base of the eyelash roots with mascara. |
Here I used CoverGirl LashBlast Volume in Black-Brown for the first two coats and then Jordana Best Lash Extreme Volumizing Mascara (reviewed here) to stamp at the base. There's no real reason why you couldn't use the same mascara for both steps. I just like the separation I get from the CG one and the thickness of the Jordana one. And then I'm left my whole eyelid (what little there is) to play with eyeshadows.
Monday, October 28, 2013
8 minute basic, work appropriate makeup routine for the lazy and/or incompetent (using affordable products)
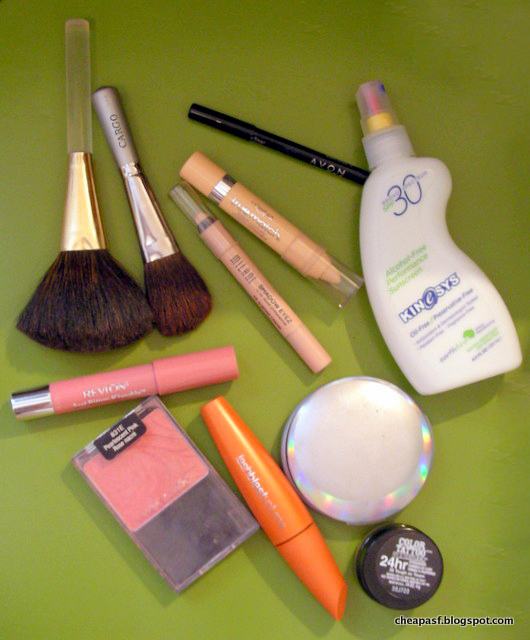 |
| See below for the list of products used. |
I feel like if this were a feature in a magazine, it would be called a 5-minute makeup look. But since I do not move quickly in the morning, I'd categorize it in the 8-12 minute range, to account for the time I spend staring blankly at the wall between each step. My criteria for choosing each product in this routine is what I oh-so-fucking-cleverly decided to call the "fast/last" rule. That is, it has to apply fast, and it has to last through most of the day without reapplying. Fast, for me, means minimizing the use of tools like brushes. If I can smear it directly on my face, great. Your version of the routine might include more or fewer steps, depending on what you like/need. For instance, I'm lucky enough that my skin is fairly clear, or at least there isn't too much that I really strongly feel like I need to cover up. I just go with concealer and powder when I am in a hurry. That's just me. If you prefer to use foundation etc., then you'd have to factor in the extra time for that.
By the way, the "lazy and/or incompetent" bit in the title refers to me in the morning. Also during the rest of the day, but mostly the morning.
Here's are the steps I take:
Tuesday, August 20, 2013
This is What Douchey Dudes Think No Makeup Looks Like (from Maskcara)
Like this sad fool:

Here's what he wants you to look like, but without doing any of this stuff:
(Also, remember that time Jennifer Lawrence wore "barely any makeup"?)

Here's what he wants you to look like, but without doing any of this stuff:
(Also, remember that time Jennifer Lawrence wore "barely any makeup"?)
Wednesday, June 19, 2013
MISANDRY Makeup Tutorial (from tadelesmith)
"You want the wings of your eyeliner to be so sharp they could kill a man . . . "
Sunday, May 26, 2013
Hair that does itself while you sleep: How to creates curls or waves in your straight hair if you are lazy and/or incompetent (picture heavy post)

I am the fucking worst at doing my hair. Seriously. I still haven't really mastered ponytails and headbands are way above my skill level. To make matters worse, my hair just does not respond to heat styling at all. It doesn't matter what tools I use, at what settings, with what products - I've tried them all. If I use a curling iron or hot rollers to curl my hair, 10 minutes later it's limp and sad and mostly straight.
Luckily, my hair is so naturally stick-straight that I don't really need to do much to it to look presentable. Usually I just wash it, put a little detangling something-or-other in it when it's wet and comb out the tangles, and then let it air dry. That's about it. Sometimes I brush it after it dries, if I want to get all fancy. You can see how straight it is in some of my previous posts.
But it's nice to have a change sometimes, right? Plus, everyone wants hair that is the opposite of what they have naturally, apparently. So I've finally come up with two ways to get waves and/or curls with minimal effort. I mean really minimal. And by "come up with", I just mean that I tried a bunch of things that other people had been doing since forever, and decided that these were the easiest.
Wednesday, May 15, 2013
Now that you've mastered winged eyeliner (?), try this trick
Disclosure: This post contains affiliate links.
So you've no doubt been spending the last 6 weeks perfecting your eyeliner game (as if you have anything better to do). How's it going? Here's something new for you to try! I call it: Using Eyeliner to Fuck with the Shape of Your Eye.
So you've no doubt been spending the last 6 weeks perfecting your eyeliner game (as if you have anything better to do). How's it going? Here's something new for you to try! I call it: Using Eyeliner to Fuck with the Shape of Your Eye.

Thursday, March 28, 2013
Fix Your Face: How to experiment with winged liner without buying new eyeliner (with photos)
Disclosure: This post contains affiliate links.

I understand, however, that people who are not makeup hoarders like me might be loathe to shell out the extra cash for a gel/cream/liquid eyeliner, in case they decide they are never going to do it. There are cheap options, but you might have everything you need to figure out if this is the right look for you at home.
Here's what you need:
Tuesday, November 20, 2012
Fix Your Face: Beetle's Wing/Scarab/Gradient/Ombre Eyeshadow Look
Whatever you want to call it, it’s fucking awesome. AND EASY. And cheap, of course.
I already directed you to this video tutorial a while ago. If you didn’t look before, do it now. Do as I say. DO IT.
In the video they use all sort of expensive shit to do this. Fuck that. You can do it for cheap.
I already directed you to this video tutorial a while ago. If you didn’t look before, do it now. Do as I say. DO IT.
In the video they use all sort of expensive shit to do this. Fuck that. You can do it for cheap.
- Instead of $25 Lorac eyelid primer, get the $1 e.l.f. shit
.
- Instead of $20 Laura Mercier eyeliner in Black Turquoise, get the $6-7 Milani liner in Blackened Teal.
(Ignore the glitter on the other end - it’s crap. Don’t expect to get two products out of this, and you won’t be disappointed when only one is useful.)
- Instead of $15 Mac Club eyeshadow, get the Wet N Wild Color Icon palette in Comfort Zone for $5, and get 7 other awesome shadows along with it. Use the bottom right shadow for this look.
- Instead of $23 Givenchy black eyeliner pencil, use whatever black eyeliner pencil you want. Seriously. It makes no fucking difference.
Wednesday, September 26, 2012
Makeup Tips for Glasses Wearers
If like me, you have once again given up on the idea that you can ever wear contacts without blinking incessantly and rolling your eyes around like a maniac.
(Though I admit I’m not necessarily going to follow the rules. I’ve worn grey/charcoal/silver eye makeup with my glasses plenty of times without looking like I have black eyes.)
Makeup Tips for Glasses Wearers
Subscribe to:
Posts (Atom)
