Disclosure: This post contains affiliate links.
Some people like the way winged/cat-eye liner looks on them, and some people don't. Depending on your eye size and shape, and your general style, you may think it is the absolute shit, or you may think it is absolute shit. You don't know until you try.I understand, however, that people who are not makeup hoarders like me might be loathe to shell out the extra cash for a gel/cream/liquid eyeliner, in case they decide they are never going to do it. There are cheap options, but you might have everything you need to figure out if this is the right look for you at home.
Here's what you need:
1. fairly soft/blendable eyeliner pencil OR dark eyeshadow
2. a small, flat, narrow brush
If you already have one of the first two, it might be worth just picking up the brush, since that's something you could use for eyeshadow or even lipstick if you end up not being into this eyeliner style. I used this brush ($1) for the liner pictured below. Just so long as you have a thin edge to work with.
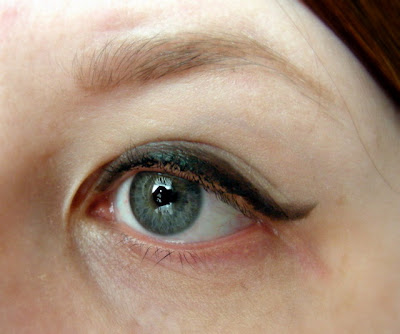
I'll start with the method for using an eyebrow pencil, and then I'll talk about the eyeshadow version. In the photos below, I lined my eyes with dark eyeliner (this one in blackened teal, also used in this look). I wasn't too worried about doing it neatly - I just tried to stay as close as possible to the lash line while also making the line semi-thick. Then I took my brush and held it parallel to the lash line, or horizontally, so that the I would be using the thin edge. I lightly ran the brush along the upper edge of the eyeliner and winged it up at the corner of my eye. You can go over it a couple of times to make it neater, though too many times and you'll start to get fading in the liner. You can always add more if necessary. It might take a few tried to get the hang of it, but it's not too tricky. You can also pull the outside corner of your eye out a bit with a finger from your free hang if you want to keep your lid more still while doing this. Here's a tutorial that might help if you are having a hard time getting the shape right. Once you get used to creating the right shape, you can do it with any tool or product the same way.
Here's how mine turned out:
Here's is how mine turned out with shadow over liner. Note that I did not apply my shadow directly over the liner. I tried to avoid it as much as possible to keep my line intact. Just having the slight overlap that is difficult to avoid is enough to soften everything a bit.
 |
| The eyeliner still wings out on the edge, but it's not so dramatic. |
Then once you get the hang of it, you can start collecting new eyeliners to play with, if you like, though really these tools will serve you just as well. Pretty fucking easy.


No comments:
Post a Comment