Showing posts with label comparison. Show all posts

Wednesday, February 27, 2019

3 BHAs: Paula's Choice 2% BHA Liquid, CosRx BHA Blackhead Power Liquid, and Stridex Maximum Strength Medicated Pads

Affiliate Links

Review of Paula's Choice 2% BHA Liquid, CosRx BHA Blackhead Power Liquid, and Stridex Maximum Strength Medicated Pads

I've been using Paula's Choice 2% BHA Liquid ($30) as part of my (almost) daily routine for over a decade now. I consider salicylic acid (BHA) one of three staple ingredients that keep my skin in good shape, along with niacinamide and (more recently added) azelaic acid (reviewed here). But with Paula's Choice prices steadily rising (it was less than $20 Canadian when I started to use it!) and my income not keeping pace, I decided to gamble on a couple of more affordable, but equally popular, BHA products. I'll review them here, along with the PC BHA, which (spoiler!) I ultimately went back to. (Hope you like acronyms, everybody!)

CosRx makes a very popular and affordable liquid BHA that is now easily accessible in the US in places like ULTA ($22) and on Amazon ($15). Because I'd previously tried Paula's Choice's BHA gel and found it less effective than the liquid, I decided to try the highly-recommended liquid from CosRx. The consistency is actually significantly thicker than the watery PC BHA, which makes it easier to apply without using a cotton pad. It's decidedly a liquid and not a gel, however. It spreads easily on my skin and soaks in well, without leaving much of a film or a sticky residue. That's nice, because I apply my BHA first thing in the morning after washing my face, and so I want it to play well with makeup and other products.

There's not a lot to say about the CosRx BHA experience, except that it did not play well with my Paula's Choice Niacinamide Booster. When I used them both at the same time, my face flushed. It didn't last more than half an hour, and my skin wasn't irritated--my face just got pink and warm. There's nothing dangerous or damaging about this sort of thing, as far as I know, but it's a little unpleasant. I haven't had that experience mixing either of those products with anything else, and it was solved by just using one in the morning and the other at night.

Otherwise, the CosRx didn't cause any problems for me, but unfortunately it didn't do much for my skin, either. The role of BHA in my routine is to reduce clogged pores and blackheads, and to keep the pimples that result from them away. It doesn't really prevent hormonal/cystic acne for me, but it certainly reduces inflammatory acne when its working. The CosRx might have helped slightly, but I wasn't as satisfied with the state of my skin while using it as I was when I used the PC version.

The main ingredient in the CosRx BHA is probably what makes the difference for me. I know that salicylic acid works for me, but the CosRx contains a different form of BHA: betaine salicylate. This ingredient is sometimes said to be gentler than salicylic acid and is supposedly longer-acting. I don't experience irritation from BHAs in general, so I can't really comment on those qualities. My (admittedly very limited) experience suggests to me that if SA works well for you, you can't necessarily count on BS (ha!) to work as well--but on the other hand, if you've had bad luck with SA, a product with BS might be worth trying.

My second affordable BHA product was a bit of a desperation purchase. I traveled a bunch, visiting family and in-laws and friends, in September, but I somehow didn't pack enough of my PC BHA to last for the whole trip. By the third week, my skin was congested and breaking out, so I picked up a tub of the Stridex BHA pads (in the red packaging!) ($4-7), which had been recommended to me on multiple good authorities. The container holds a lot of pads and a lot of liquid, so they're not likely to dry out before you finish them. In fact, one pad was more than enough for my face, and so I started to cut them in half.

The pads are soaked in a 2% salicylic acid liquid, closer in composition to my PC liquid than to the CosRx product. They also contain a bit of menthol, so you get that medicinal smell and a mild cooling sensation--too mild to call it a "tingle." Still, I could do without it, considering it doesn't add anything. These pads served well enough in a pinch to start clearing up my skin a bit. In the long run, however, after I got home again they just weren't quite as effective as the PC liquid. My breakouts subsided and my pores weren't quite as clogged as they had been, but not as clear as I knew they could be. I ended up, as you know, going back to Paula.

I'm still using the Stridex pads, though. I've found over the years that otherwise disappointing BHA and AHA products work great as aftershave on my legs and armpits. If I swipe these on after shaving and before moisturizing, I almost never get razor burn or ingrown hairs. In fact, the price is so good, that I'd recommend picking up a tub of Stridex pads specifically for this purpose if you're a shaver. Their anti-inflammatory and exfoliating properties are ideal.

So now I'm back on the Paula's Choice BHA to stay, I guess. It's a thin liquid about the consistency of water, but it feels a bit sticky on my skin after I apply it. I think the stickiness bothers some people, but since I always follow up with moisturizer and/or sunscreen, I don't mind it (the product on top gets rid of that stickiness). It works perfectly well layered under every other product, skincare or makeup, I've used. And while the bottle is expensive, I only used 4-6 drops at a time, so it lasts me up to six months of daily use. Most importantly, it effectively and significantly reduces clogged pores and inflammatory zits for my skin.

I'll probably never stop testing cheaper alternatives to products I like, even if they fail to impress me half the time, but I suppose there's something satisfying in knowing that I haven't been wasting my money all these years. It's also a reminder that if I had ruled out BHAs entirely after trying the CosRx, I would have been missing out. Just like how glycolic acid doesn't do anything for my face, while lactic acid is excellent--if I had ruled out products called AHAs on the basic of glycolic acid alone, I'd be missing something useful.

Has anyone else tried all three of these? How do they compare for you? I'm also curious about other people's philosophy's on searching for less expensive alternatives to "holy grail" skincare products? Is it worth the gamble, or do you fear you'll almost always end up spending more money in the process?

Saturday, July 14, 2018

Urban Decay Backtalk Vice Lipstick Comparisons (plus a quick review of NYX Slip Tease Full Color Lip Oil in Lowkey)

Affiliate Links

Urban Decay Backtalk Vice Lipstick and NYX Slip Tease Full Color Lip Oil in Lowkey

Urban Decay's Vice Lipstick in Backtalk, in their Comfort Matte finish, is one of the most popular shades in that huge line. They even made a whole eye and face palette based on it. It's in that dusty pink/mauve/MLBB (my-lips-but-better) family, which is the largest category of lip products in my hoard. Despite its popularity and my personal preference for this type of shade, there's something about Backtalk that's just a little off when I wear it. It's not that it looks bad, exactly, but it also doesn't make my face look better than it did without any lipstick.

I decided to swatch all my lipsticks that are even remotely similar to see if I can pick out any patterns and discern why Backtalk doesn't work for me. And since I was doing that, I figured I might as well post them here for you, in case you want to find/avoid dupes--or in case you can help me answer my question.

Here are the swatches, in no particular order. The first swatch in every photo is always Urban Decay Backtalk.

Swatches of Urban Decay Backtalk, Bite Beauty Pepper, Bite Beauty Matte Crème Lip Crayon in Glacé, BareMinerals GEN NUDE Liquid Lipstick in Swag,  Kat Von D Everlasting Liquid Lipstick in Lovesick, Make Up For Ever Artist Rouge Lipstick in Rosewood, Bite Beauty Amuse Bouche Lipstick in Fig

1. Urban Decay Backtalk

2. Bite Beauty Pepper (Luminous Creme formula)

3. Bite Beauty Matte Crème Lip Crayon in Glacé

4. BareMinerals GEN NUDE Liquid Lipstick in Swag

5. Kat Von D Everlasting Liquid Lipstick in Lovesick

6. Make Up For Ever Artist Rouge Lipstick in Rosewood

7. Bite Beauty Amuse Bouche Lipstick in Fig

So of the lipsticks in this selection, besides Backtalk, the only two I don't really like on myself are the KVD Lovesick and Bite Fig. Lovesick is a little cooler, with more pink/purple, than Backtalk, and Fig is much warmer and peachier. (Fortunately Lovesick is also a sample, because since it does that dried-up butthole thing to my lips, I wouldn't want to be stuck with a whole tube. Also, I don't buy Kat Von D products.) I'm not sure I'm seeing a pattern here yet.

Swatches of Urban Decay Backtalk, Bite Beauty Amuse Bouche Lipstick in Rhubarb, Maybelline Creamy Matte Lipstick in Touch of Spice, NYX Slip Tease Full Color Lip Oil in Lowkey, Colourpop Lux Lipstick in Angel City, Nars Satin Lip Pencil in Rikugien, Wet N Wild Megalast Lipstick in Rose-bud

1. Urban Decay Backtalk (It's interesting how Backtalk will look different depending on what other swatches you put it next to. The lighting is the same!)

2. Bite Beauty Amuse Bouche Lipstick in Rhubarb

3. Maybelline Creamy Matte Lipstick in Touch of Spice (reviewed here)

4. NYX Slip Tease Full Color Lip Oil in Lowkey (which is very, very similar to Touch of Spice--more on this lipstick below!)

5. Colourpop Lux Lipstick in Angel City

6. Nars Satin Lip Pencil in Rikugien

7. Wet N Wild Megalast Lipstick in Rose-bud

Everything here is much warmer than Backtalk, and it all works well for me, so maybe that's something. Rhubarb is slightly blah on me, but I'm guessing it would look great on people who like Revlon Sultry, which is similar to Maybelline Touch of Spice but slightly less flattering on me (review/comparison here).

Side note: has anyone ever come across a dupe for Wet N Wild Rose-bud? I love the color, but the Megalast formula always dries out my lips.

Swatches of Urban Decay Backtalk, L'Oréal Colour Riche La Lacque Lip Pen in Choco-lacque, Urban Decay Revolution Lipstick in Rapture, Urban Decay Sheer Revolution Lipstick in Sheer Rapture, Revlon Balm Stain in Honey, Tom Ford Lip Color Matte in Pussycat

1. Urban Decay Backtalk 

2. L'Oréal Colour Riche La Lacque Lip Pen in Choco-lacque (reviewed here)

3. Urban Decay Revolution Lipstick in Rapture (discontinued, but available in Vice format)

4. Urban Decay Sheer Revolution Lipstick in Sheer Rapture (discontinued)

5. Revlon Balm Stain in Honey (reviewed here)

6. Tom Ford Lip Color Matte in Pussycat

Pussycat looks closest to Backtalk here, and it's also the one I like least on my face, though slightly better than Backtalk. These two lipsticks are both pretty muted (i.e. they have grey added), so that could be a clue. Rapture looks muted when you consider it alone, but next to Backtalk, it's a bit more saturated.

Swatches of Urban Decay Backtalk, Tarte Tarteist Creamy Matte Lip Paint in Birthday Suit, LA Girl Matte Lipstick in Snuggle, Burt's Bees Lip Crayon in Sedona Sands, Bite Beauty Amuse Bouche Lipstick in Thistle

1. Urban Decay Backtalk 

2. Tarte Tarteist Creamy Matte Lip Paint in Birthday Suit (i.e. last year's Sephora birthday gift)

3. LA Girl Matte Lipstick in Snuggle (reviewed here)

4. Burt's Bees Lip Crayon in Sedona Sands

5. Bite Beauty Amuse Bouche Lipstick in Thistle

None of the above is particularly similar to Backtalk, so the fact that most of them work for me isn't especially informative. The exception is Birthday Suit, which is an unflattering beige--I think it's the yellow undertones that set it apart from the superficially similar Snuggle. Come to think of it, though, Thistle is both very muted and pretty cool, and I like it a lot on me. Maybe that's because it's more of a statement corpse-lip, rather than just looking accidentally blah. (I'm wearing it in this Instagram pic, though the lighting isn't great.)

You probably want to see what Backtalk actually looks like on me at this point. (Apologies for the grainy photo.)


Like I said, it's not awful, but a great lipstick will light up your face, and a good lipstick will at least be better than nothing.

I'm not sure what I've learned through this process. I need my MLBB lipsticks to be muted, but not too muted, and more brown than grey, maybe. Or more brown than pink? Thoughts? I have definitely learned that I have way too many similar lipsticks (ok, I already knew that), and that weirdly enough I have never reviewed most of these. Any you'd like to know more about?

I'll tell you more right now about one of them. I recently used Ulta points to pick up a lipstick from one of NYX's 700 or so liquid lipstick lines, a newer one called Slip Tease Full Color Lip Oil. It's full color, sure, but having oil in the name is a bit of a red herring. It's not like YSL Tint-In-Oil or most other products called lip oils. It's less drying than most matte liquid lipsticks, sure, but there's nothing that looks or feels oily about it. (There are a few oils halfway down the ingredients list, but a lot of other things come before them.)

Here is Lowkey on my face:


More flattering, wouldn't you agree, than Backtalk? The rest of my makeup is the same, as is the lighting. Here's a lip swatch:


When you see it all alone, it looks like a rosy pink, but in the swatches above (second set), you can see that it definitely has some brown in it when compared to other lipsticks in the same family. The formula is really lovely. It's slightly moussey and thick enough that you can easily and neatly apply it using just the doe foot (not as thick as the Tarte liquid lipstick, though). It's opaque in one coat, but not so pigmented that it risks getting really messy. The finish is demi-matte. It dries down a bit but not completely, so it retains slip and moisture and feels pretty much like a bullet lipstick--yet it doesn't transfer easily. Wear time is about the same as a decent bullet, so you'll probably have to reapply after a meal. Best of all, it doesn't dry my lips out.

This is one of the nicest lipsticks I've tried recently, and probably the nicest liquid lipstick I've ever used. I'd recommend giving it a try if you see a color you like. That's my one complaint: while I love Lowkey (way to be hip to the new slang, kids), none of the other colors really interests me. There's variety, but something about the selection bores me. Bang Bang and Entice might be ok? I think a terracotta orange would be really great in this formula.

I kind of ordered Lowkey blind (you can never trust Ulta's photos for color accuracy), but it ended up working great. It would be nice if I could work out some kind of rules to predict which lipsticks will work best on me. Do you know what works for you when you see it, or do you have to try everything on like I do?

Thursday, July 5, 2018

For Dry Eyes Only: Review of IT Cosmetics Bye Bye Under Eye Full Coverage Anti-Aging Waterproof Concealer

Affiliate Links

Review of IT Cosmetics Bye Bye Under Eye Full Coverage Anti-Aging Waterproof Concealer

I have a wandering eye when it comes to makeup, and it usually doesn't do me much good. I have a totally reliable, nearly perfect under-eye concealer in the form of Sephora Gel Serum Concealer (reviewed here), and yet . . .

It Cosmetics Bye Bye Under Eye [insert long name here] is one of those concealers that comes up whenever people ask for recommendations, alongside things like Nars Radiant Creamy Concealer. So I was tempted. I should have known better, since it claims to be waterproof. Things can usually be waterproof or oil-proof, but not both (which makes perfect sense). I do have pretty watery eyes, so a waterproof concealer isn't a bad idea in theory, but my skin also tends to get oilier and oilier as the day goes on. It's almost always more important for my makeup to be able to withstand my oily skin than to resist water.  This concealer just doesn't hold up for me, unfortunately.

It has some great qualities that I'm sure contribute to its popularity. For one thing, it's incredibly pigmented, so that you only need a tiny bit of the thick product to cover the entire under-eye area. For me, this is all it takes for one eye:

Review of IT Cosmetics Bye Bye Under Eye Full Coverage Anti-Aging Waterproof Concealer

It also blends easily and covers well enough, initially. The packaging, a simple squeeze tube with a very narrow dispenser is great--it will limit the amount of air and bacteria that can get in, but also makes it easy to squeeze out the last few specks. Bye Bye Under Eye only comes in six shades. I chose the lightest, called Light (Very Fair). In makeup lingo, "light" and "very fair" are usually two different things, but sure. Here is a swatch compared to a bunch of other concealers to help you decode that label:

Swatches of IT Cosmetics Bye Bye Undereye in Light; Sephora Gel Serum Concealer in Fondant; Nars Radiant Creamy Concealer in Chantilly; Kevyn Aucoin Sensual Skin Enhancer in Sx02; Urban Decay 24/7 Concealer Pencil in CIA; Hard Candy Glamoflauge Concealer in Ultra Light.

From left to right: (1) IT Cosmetics Bye Bye Undereye in Light; (2) Sephora Gel Serum Concealer in Fondant; (3) Nars Radiant Creamy Concealer in Chantilly; (4) Kevyn Aucoin Sensual Skin Enhancer in Sx02; (5) Urban Decay 24/7 Concealer Pencil in CIA (discontinued); and (6) Hard Candy Glamoflauge Concealer in Ultra Light.

It Cosmetics Light is closest to Nars Chantilly. I found it to be a good match for my skin tone, fortunately, since the shade options were limited. It's probably a closer match than Sephora Fondant, in fact, though the extra warmth of Fondant means it actually does a better job of canceling out my dark circles. The consistency and pigmentation of Bye Bye Undereye is most similar to the Kevyn Aucoin Sensual Skin Enhancer, but the IT doesn't have that strong floral/powdery fragrance. (By the way, Hard Candy Ultra Light is the lightest concealer I have ever found, so if you have trouble finding something pale enough for you, it's worth a shot.)

On the downside, I found that Bye Bye Under Eye creased really badly on me and highlighted fine lines and flakiness that I didn't even know were there. I tried various application methods with no improvement. The photo below was taken immediately after application, patted on with my finger over well-moisturized but not primed skin. I'm not wearing any other makeup besides eyebrow pencil. (I forgot to take a before photo, but you can see the bare state of my dark circles here or here.)

Review of IT Cosmetics Bye Bye Under Eye Full Coverage Anti-Aging Waterproof Concealer

The coverage is good, but the texture isn't ideal, and it's creased a whole lot. Not a huge deal, maybe, because most concealers crease right after I apply them, and I can usually blend a little more after a few minutes to soften the creasing.

Here it is with the rest of my makeup applied, after a little more light blending with a sponge, and setting with No.7 loose powder (reviewed here).


The texture is worse, and instead of the creases smoothing out, the concealer has basically just lifted out of them. It has also already faded quite a bit just in the amount of time it took me to apply the rest of my makeup. Sigh. (As I said, I tried a few different application/blending/setting methods with the same results.)

Besides the lack of a smooth surface, the other big problem, which I mentioned above, is that the oil in my skin just devours this stuff. By the end of the day, there's very little left, except what was caught by those lines and flakes. Lovely.

Review of IT Cosmetics Bye Bye Under Eye Full Coverage Anti-Aging Waterproof Concealer

The photo above was taken after about eight hours on not a particularly hot or sweaty day. My skin is what you might euphemistically describe as dewy. Even so, my mascara (Tarte Lights, Camera, Lashes) and my eyebrow pencil (Essence Eyebrow Designer Pencil) have stuck around just fine. My dark circles are on major display, though.

To be fair, this is what happens to most concealers on my face. One of the things that impressed me so much about the Sephora Gel Serum (please never discontinue it, please, please, please) was that it was still there at the end of the day. So this problem doesn't necessarily make this concealer worse than all other concealers, just worst than my fave.

Clearly a lot of people out there like this stuff. My guess is that those people do not have oily skin. If you have drier skin and teary eyes, maybe this is great. (Though I would still be concerned that it would highlight flaky skin, to be honest.) But if your skin type is similar to mine, I certainly wouldn't recommend this product. I've already bought another tube of my trusty Sephora concealer, which costs $14 versus IT Cosmetics' $24--though note that the IT tube contains twice as much product, so if you like it and can get through it all before it starts to dry up, it's actually a better value.

If this concealer is your holy grail, I think it would be really helpful for people reading this review if you would comment and let me know what type of skin you have and what you look for in a concealer.

Anyway, lesson learned.

Maybe.

Probably not.

Saturday, June 2, 2018

New and improved? The new Wet N Wild Comfort Zone palette compared to the original

Affiliate Links

Review of new Wet N Wild Comfort Zone palette compared to the original

I have something of a series now comparing reformulated Wet N Wild products with their predecessors (here and here), among them some of my favorite affordable makeup. Those previously revamped products didn't exactly measure up to the originals in my comparisons, so I have to admit I had serious doubts about the new Wet N Wild Comfort Zone palette. Why change something that has been consistently recommended as one of the best drugstore eyeshadow palettes on the market?

I've been thinking the answer to that question for a while. Unlike many redesigns by other brands, Wet N Wild didn't reduce the product size while jacking up the price. In fact, the price has remained the same, while the weight has actually increased (minimally) from 0.3 to 0.32 oz. Because two new matte shades were added, and they are in the largest pans, that should mean that the size of each of the original shades has decreased, however, which is worth noting.

If I had to guess why the change was made, I'd point to the fragility of the shadows, and maybe the packaging too. I can't be sure, but I do know lots of people complained about their Wet N Wild shadows crumbling and shattering with the slightest bump. I don't know if you can see it in the photo above, but the duochrome in the in bottom right of my old palette does has a small chunk missing--I have no idea when or how that happened. If the eyeshadows broke too often after people bought them, you have to assume that they also frequently broke in transit and while they were in stores, so the amount of product discarded might not have made up for the number of sales. (I'd be curious to hear if anyone's new palette has crumbled, but the shadows seem a bit more durable to me.) Of course, there's also the fact that a new release/re-release generates publicity and increases sales.

I've had my OG Comfort Zone palette since 2011 or 2012, and despite appearances, I've used it quite a lot. It has intense, smooth, metallic shimmers that perform really well. I'm not such a fan of the matte shades with glitter ("Definer" on the left and "Crease" on the right) though they are decent for lining the eyes. I like it so much that the reformulation had a lot to live up to. I'm not going to do a full review of each palette, but I am going to compare each shade and show you some swatches and eye looks.

Here is the first row of shimmers, in the (new) order of the new palette, starting with the left hand column. All applied over Wet N Wild primer (reviewed here) to make the colors and finishes as clear as possible for comparison. The old version is on the left and the new version is on the right.

Wet N Wild Comfort Zone comparison swatches

Wednesday, April 11, 2018

The duochromes always get me: Review of L'Oréal Infallible Galaxy Lumiere Holographic Eyeshadows in Crescent Moon, Full Moon, and Moon Kissed

Affiliate Links

Review of L'Oréal Infallible Galaxy Lumiere Holographic Eyeshadows in Crescent Moon, Full Moon, and Moon Kissed

Two duochrome posts in a row? Is that allowed? (As usual, we ignore the word "holographic" when it's in the name of a makeup product.) I love duochromes, and they make me pay more for drugstore eyeshadows than I normally would. More for eyeshadow singles in general (though there was that time I paid full price for Urban Decay X, and I don't even really like it). These (deep breath) L'Oréal Infallible Galaxy Lumiere Holographic Eyeshadows are $13 a piece, so I suggest waiting for a sale, which will always come sooner or later for drugstore makeup. I had a B2GO Free deal from, but if I hadn't also had Ulta points from my credit card to spend, I might have balked even at that.

None of that is to say that I don't think these eyeshadows are amazing and totally worth picking up if you are a duochrome fiend like I am. They're absolutely lovely.

The formula of these eyeshadows is interesting. Though they have the "Infallible" name attached to them, they're not the same as the regular Infallible singles (reviewed here), which come with little plates on top to keep them densely packed. These Galaxy shadows have a more spongey texture--not as squishy as Colourpop Super Shock eyeshadows, but if you press your finger into the pan, you can feel it compress a bit. I dropped Full Moon on the floor and, instead of shattering, the whole shadow came loose in one piece inside the pan. I was able to press it back in place with a finger. Like the L'Oréal Infallible eyeshadows and the Colourpop Super Shock shadows, these apply best with a finger. With a brush they go on very sheer and a little patchy.

How about I let my many, many photos do the talking? My swatches were made with a brush without primer. Each one is several layers, because these shadows are sheer, and in swatch form they don't show up clearly in a single layer.

Left to right: Crescent Moon (sheer beige with green shift), Full Moon (white gold), and Moon Kissed (purple with blue shift).

Swatches of of L'Oréal Infallible Galaxy Lumiere Holographic Eyeshadows

Wednesday, February 14, 2018

Concealing Redness with Yellow Corrector: Comparison of Urban Decay Color Correcting Fluid and L.A. Girl HD Pro Conceal

Affiliate Links

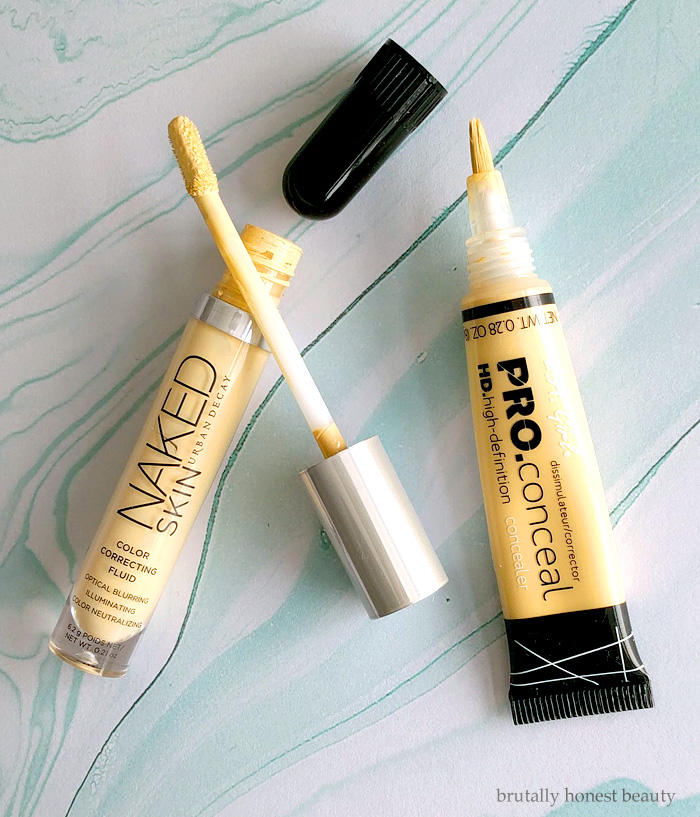
Urban Decay Color Correcting Fluid vs. L.A. Girl HD Pro Conceal in Yellow

On a daily basis, I don't tend to wear a full face of foundation or other base product. Some days I'll feel ambitious enough to slap on some tinted moisturizer, but it's rare that I use a fuller coverage foundation. Still, I have a significant amount of redness in my skin, especially in the center of my face, concentrated on either side of my nose. I've also been breaking out a lot lately, and that adds to the redness on my chin and forehead between my eyes. I want that shit to be less obvious.

Rather than covering my face with a uniform layer of product, my preferred camouflage is color corrector in the red areas, a liquid concealer under my eyes, and spot concealing for blemishes. Then I set everything with a loose powder, and I'm good to go. It probably takes nearly as much time for this routine as it would to use an opaque foundation, but for me, this is an easier, lower maintenance process. I also tend to like how my makeup looks by the end of the day. I've tried many foundations and I never really like how they wear, though some are better than others. Finally, I just don't love the feeling of foundation on my skin, and I get self-conscious about whether or not I'm rubbing it off somehow. So foundation is something that I tend to only use occasionally.

I've written about using the Urban Decay Naked Skin Color Correcting Fluid to conceal redness before (here). For whatever reason, yellow color correctors, as far as I've seen, are never advertised as targeting redness. In fact, I've never even seen anyone write a blog or Instagram post (etc.) saying that they use yellow corrector for this purpose. But I am here to tell you that if you haven't had good luck trying to cancel out redness with a green color corrector, it's worth giving yellow a shot instead. For me, green correctors tend to add a greyish cast to my skin, while yellow simply disguises the redness. You can see a comparison in my previous post of the subject, where I go into more detail about why I think this works.

(Yellow correctors are usually aimed at improving "brightness," but it's not clear to me exactly what problem this is correcting. If you use yellow for brightness, I'd love to hear about what it does for you.)

What I really want to do here is compare the Urban Decay yellow corrector, which contains 0.21 oz. of product for $28, with L.A. Girl HD Pro Conceal in Yellow, which contains 0.28 oz. for about $3-4 (depending where you buy it). I don't think I need to do any math for you to see the massive value difference there, so I had high hopes that the L.A. Girl option would be a functional substitute, since I use this corrector so much that I go through it very quickly. I'm not eager to drop another $28 on such a small product if I can avoid it.

Swatching the two yellow correctors, you can see some subtle differences. The Urban Decay corrector has a more opaque, whitish base, and the L.A. Girl corrector is slightly more translucent and lacks that white base. I'm not sure these differences are strong enough even to be visible in my photo, but they are detectable in person. Urban Decay on the left; L.A. Girl on the right.

Swatches of Urban Decay Color Correcting Fluid vs. L.A. Girl HD Pro Conceal in Yellow

Here's my bare face right now--as I said, I've been breaking out worse than usual for the past couple of months. I'm working on controlling that, but in the meantime, I'd like to disguise it.


You can see that the redness is concentrated on either side of my nose, but also between my eyebrows, and on my upper lip and chin. I also have mega dark circles that are reddish-purple.

Below I've applied the Urban Decay corrector on the left side of the photo, and the L.A. Girl on the right side of the photo. I've only used it over those red areas mentioned above. (I also put on mascara and brow pencil, as you can tell, because my face hairs are no longer completely invisible.)


I think you can see, despite the mediocre indoor lighting, that it works really well to conceal redness in a natural way on my skin. Can you see any differences between the right and left sides of my face? Personally, I can't see any in the photo, and I couldn't see any in person either. Any visible differences are just because the blemishes in my skin aren't perfectly symmetrical.

Here are closeups of each side so that you can see what the texture looks like on my skin. Again, I don't see any real difference. Both products have a slight tendency to highlight flakiness, but not dramatically, and not to the extent that I'm bothered by it.

Urban Decay:


L.A. Girl:


In these photos, I've used the corrector under my eyes, as well as on other red areas. For everyday use, I skip adding it to my eye area and just use my usual Sephora concealer (reviewed here), which has a slight yellow tint to it. I don't find that layering a yellow corrector under concealer in that area makes a big enough difference to be worth the extra work. I do, however, pat the extra Sephora concealer that's on my fingers after I blend it under my eyes on to the skin next to my nose. Then I spot conceal pimples with Urban Decay 24/7 Concealer Pencil, which seems, unfortunately, to have been discontinued. Finally, I set everything with loose powder.

Here's the final result with all my makeup (hey hey hooded eyelids!):


I like the results. As for other points of comparison between the Urban Decay and L.A. Girl correctors, the biggest difference is the packaging. The Urban Decay packaging is prettier, yes, but I also prefer it in terms of function.

Urban Decay Color Correcting Fluid and L.A. Girl HD Pro Conceal in yellow review

I apply my concealer/corrector with a flat concealer brush (I have this stupidly expensive Clé de Peau brush that I got for free, but anything similar should work). I'd much rather just pick up the product from the UD doefoot than squeeze it out of the L.A. tube into its stupid brush tip. It's harder to control how much comes out of the squeeze tube. I suppose it might be easier to use up the last dregs of the product left in the squeeze tube at the end of its life, however.

In terms of wear time, they're about the same for me. It's not all left at the end of the day, but my face is still less red than it would otherwise be, and the makeup doesn't look cakey or weird.

Overall, since most things are about equal, I'd certainly recommend the L.A. Girl yellow concealer. It's cheap enough that even if you want to just experiment and figure out if yellow corrector will do anything for you at all, you won't be taking much of a risk. But I don't think there's a real advantage to the Urban Decay option, anyway. The slightly more translucent base of the L.A. Girl product also makes me think that it would work better on darker skin than the whitish Urban Decay corrector--though there is probably a limit, because it is still a light yellow.

I was seriously surprised by how well this L.A. Girl HD Pro Conceal corrector worked for me, considering that I had tried one of their regular concealers in the past, and wasn't impressed (reviewed here). But for a product like this that isn't supposed to match skin tone and isn't supposed to create a totally opaque concealing layer, it's fantastic.

Is there seriously no one else out there who uses yellow to cover redness? Hello? Anyone?

Tuesday, October 24, 2017

My First Colourpop: Blotted Lip in Candyfloss

Review of Colourpop Blotted Lip in Candyfloss

Here I am, as usual, years behind the trend curve, with my one and only Colourpop purchase. For whatever reason, I've never been particularly attracted to Colourpop products. It may be because, despite my unreasonable hoard of makeup, I tend not to approach makeup with a collector's attitude, but rather by looking for functional, workhorse products. Most of the time. I get the impression that Colourpop makeup tends not to last an especially long time, either because of its small size or because it will dry up or go bad quickly (obviously this is unlikely to be the case with their new pressed powders). For instance, the Lippie Stix like the one I'm reviewing here are pretty cheap per unit at $5 a piece, but since they contain only a gram of product, they are relatively expensive by weight. I think, then, that they are ideal for someone who wants one of every color and/or doesn't expect to finish lipstick quickly, but less ideal for someone looking to discover their favorite lipstick and wear it constantly. But you know all of that already.

None of the above prevented me from pouncing when Colourpop offered a Blotted Lip for free with shipping a few months ago. It was the perfect way for a (cheap) skeptic like me to try one of their products without having to commit to a big order that would make the shipping seem more reasonable (bad economics, I know). I was on a brown/terracotta lipstick kick this summer (like everyone else), and it hasn't ended yet, so I'm glad I chose Candyfloss. The Blotted Lips are sheer, matte lipsticks, most often compared to Glossier's much pricier Generation G lipsticks.

Here's Candyfloss on my lips:

Swatch of Colourpop Blotted Lip in Candyfloss

It's actually not super sheer, as you can see, but it's translucent enough to make it easy to swipe on quickly without worrying too much about mistakes. Because it's sheer, it can look a tiny bit patchy, but only on really close inspection, which most people are not going to subject you to, I assume. I'm guessing that it might appear smoother on someone with a more brownish or peachy natural lip color than it does on my pink lips, because the color showing through wouldn't contrast--whereas pink or fuschia sheer stains tend to look more natural on me.

I like this lipstick a lot. It wears well, and when it fades, it doesn't look messy. It's slightly drying, but you can apply a decent layer of balm underneath or even on top of it, and it will only enhance how it looks. (I'm unreasonably picky about things that dry out my lips, so you might not find this stuff drying at all.) I haven't had any difficulty with the packaging or anything else.

Here are comparisons with some other brownish lipsticks I own. I swiped each one just a single time so that you can see the relative opacity.

Swatches of Colourpop Blotted Lip in Candyfloss

Left to right: (1) Colourpop Blotted Lip in Candyfloss; (2) Urban Decay Epigram; (3) Maybelline Maple Kiss; (4) LA Girl Matte Flat Velvet Lipstick in Hush; (5) Maybelline Touch of Spice; and (6) Bite Beauty Pepper.

Candyfloss is now the most orangey-brown lipstick I own, even compared to Maple Kiss, which I used too think was too brown for me to wear. It's quite clearly a lot sheerer than the others I've swatched, though Hush and Pepper are close. If you want a sheer, matte, nude that's available in drugstores (i.e. not just online like Colourpop), LA Girl Hush is a decent alternative for only $4, though obviously it's a much cooler nude than Candyfloss.

The colo(u)r of Candyfloss is beautiful, and the formula is great, so if you're placing a Colourpop order, I wouldn't hesitate to recommend it\\adding it to your cart. Of the Blotted Lips, it's one I haven't heard people talk much about, but it's very wearable (at least for me). I probably won't be picking up more of these any time soon, or any other Colourpop products for that matter, but that's mostly because I am trying not to spend money on makeup right now. I will certainly let you know if I happen upon another Colourpop freebie, however!

ETA: Here's a $5 off referral link!

Do you prefer sheer or opaque lip products? Sheer are more beginner friendly, and I certainly had to work my way up to the super-pigmented, but I still love something like this that's simple to apply and reapply.

Wednesday, October 4, 2017

Is No7 Perfect Light Loose Powder a dupe for Laura Mercier Translucent Loose Setting Powder?

Review of No7 Perfect Light Loose Powder and Laura Mercier Translucent Loose Setting Powder in Translucent
Left: No7 Perfect Light Loose Powder; Right: Laura Mercier Translucent Loose Setting Powder in Translucent
Translucent powders are hard to review. If they work well, they look like nothing at all. I got a mini jar of Laura Mercier Translucent Loose Setting Powder as a Christmas gift last year, and I liked it enough that I considered spending the $38 to get the full size. But that's a lot of money, so I needed to think carefully about why I liked it.

No7 Perfect Light Loose Powder and Laura Mercier Translucent Loose Setting Powder in Translucent
Top/Left: No7 Perfect Light Loose Powder; Bottom/Right: Laura Mercier Translucent Loose Setting Powder in Translucent
It's truly invisible on my skin, no matter how much I apply. I use it to set my concealer and I've used it on bare skin and over foundation. It never looks powdery and it doesn't cause what's under it to get dry and weird. Now YMMV on this aspect, because I've read reviews in which people have said that this powder looks cakey and obvious on their skin no matter what they do with it. I don't know for sure what the cause is, but I'm guessing it has to do with the color. It's very pale and on the yellow side of neutral. Translucent, sure, but if you have darker or cooler skin, it might not be translucent enough. In fact, I'm pretty certain that's the case, because Laura Mercier recently added a second shade called Translucent Medium Deep--the original is just called "Translucent." (Of course, the mini jar only comes in the lighter shade. Sigh.) Since I'm pale and neutral-toned, the lighter shade works well for me.

It also creates a natural, flattering finish on my skin. It mattifies but not so much that it looks dry and powdery. It has a very subtle blurring or softening effect without any shimmer at all. And while it doesn't exactly make my makeup wear all day under sweaty conditions, it works well enough to set everything.

It's great and I like it a lot, but it's not exactly magic or anything. So when I read somewhere that No7 Perfect Light Loose Powder was a $13 "dupe" for the LM powder, I decided to give it a shot. I'm admittedly not terribly picky about powder, so I figured that even if it wasn't perfect, it would be adequate for the time being.

(You might note that the LM powder contains 1 full oz., while the No7 has only 0.7 oz., but that still makes the No7 significantly cheaper either way you look at it.)

The main difference between the two powders is the color. While they are both light and translucent, the No7 powder is quite a bit pinker.

No7 Perfect Light Loose Powder and Laura Mercier Translucent Loose Setting Powder in Translucent
Left: No7 Perfect Light Loose Powder; Right: Laura Mercier Translucent Loose Setting Powder in Translucent
As I said, my skin tone is just on the warm side of neutral, but while I guess the LM powder is technically a slightly better match, they both work equally well for me in practice. Here are heavy finger swatches for another comparison:

No7 Perfect Light Loose Powder and Laura Mercier Translucent Loose Setting Powder in Translucent
Top: No7 Perfect Light Loose Powder; Bottom: Laura Mercier Translucent Loose Setting Powder in Translucent
No shimmer, as you can see.

I also blended out the swatches, but the photo isn't very helpful. I guess you can see why I didn't bother to show you a photo of the powder on my face. They both turn invisible on my skin.

No7 Perfect Light Loose Powder and Laura Mercier Translucent Loose Setting Powder in Translucent
Top: No7 Perfect Light Loose Powder; Bottom: Laura Mercier Translucent Loose Setting Powder in Translucent
But maybe you can see a little of the softening effect I described? Maybe not.

Other than the color, I haven't noticed any real difference in performance between these two products, so I'm quite satisfied with my budget option.

I will say that the packaging for the No7 is a little overly bulky and also slightly messier than the LM powder. Powder tends to settle on that sort of ledge around the edge of the jar and then scatter from there (you can see what I mean in the second photo above). Neither of these powders is so light that it flies all over the room and up my nose, fortunately (looking at you, MUFE HD powder). Both jars have annoyingly domed lids so that you can't stack anything on top of them--the No7 is almost but not quite flat, just to rub it in. And they both came with very nice powder puffs inside, which, in both cases, I promptly lost, because I use a brush--so no photos, sorry.

My suggestion is that if you are similar to me in coloring, just go with the cheaper No7 option. It's available for the same price at Ulta and Target. If you are pale but very warm, and you're concerned that the No7 might not be a good match, the Laura Mercier powder might be a better bet--but honestly I would still probably gamble that the No7 would be translucent enough to work for you. If you have darker skin, it's probably going to be worth your while to purchase the darker Laura Mercier shade. And let's hope that No7 and other brands get their shit together and realize that even if something is translucent, a light shade is not going to work for everyone. Is it really so hard to produce two fucking shades?

Sunday, May 7, 2017

Beauty Blender Dupe? Review of L'Oréal Infallible Blend Artist Foundation Blender Sponge

Affiliate Links

Comparison of L'Oréal Blend Artist Foundation Blender Sponge and Beauty Blender

A few years ago, I wrote a post that discussed whether there was really a major difference between the original Beauty Blender sponge, which had just recently become the new big thing, and other pink makeup sponges that were beginning to appear on the market in imitation of the Beauty Blender for much less. At the time, I found that knock-offs didn't perform quite as well as the real deal. They worked okay, but there was a meaningful difference between Beauty Blender and the cheaper options available at the time--though I still balked at spending $20 on a single sponge. (By the way, it's 10% off from Nordstrom right now, if you are a die-hard fan. Don't pay full price!)

I happened to get two Beauty Blenders for free or very cheap over the years. The first one came in a Birchbox long ago, and the second, if I remember correctly, I got using points from my Ipsy account. Because I rarely wear foundation and I use the sponge dry to blend my concealer most of the time, those two sponges lasted a long time. You can see in the photo above that my second one (top above) is now a little worse for wear--not least because it became a cat toy one night--so I recently began to think about replacing it. I had that old, cheap pink sponge (bottom of photo above) in a drawer, and it worked fine, but I admit I'd got used to the soft bounciness of the real BB. I heard that the new makeup sponges from L'Oréal were some of the best affordable BB alternatives available, so I added their Foundation Blender sponge (middle above) to an Amazon order last month, where it's only $7. L'Oréal also has two other sponges in this line: a pointed, egg-shaped concealer blender, and a flat contour blender. I haven't tried those two, so I don't know if they perform similarly to the foundation sponge. Anyone?

The major advantage of the Beauty Blender over its cheapest knockoffs is that it's designed to be used wet in order to really blend and soften your foundation. When it's been soaked thoroughly in water and squeezed out, it increases in size significantly and becomes squishier. The water is also supposed to prevent too much foundation from being absorbed by the sponge, though you'll still end up using more product than you would applying it with your fingers or even with a brush. The cheap sponges tend to be harder and denser, and getting them wet doesn't alter their consistency much. The L'Oréal sponge, however, expands and softens just as much as the Beauty Blender when it's wet. For the photo below, I ran lukewarm water over each sponge while squeezing it out and letting it saturate again 10 times. You can see in the photo below, I think, that the BB and L'Oréal sponge have expanded more than the cheapie (though the difference is somehow less obvious in a photo than in person). It's too bad I don't have two of each sponge to show you a before and after, but the first two have grown by at least a third of their original size, and the third sponge has only expanded slightly.

Comparison of L'Oréal Blend Artist Foundation Blender Sponge and Beauty Blender

My L'Oréal sponge feels a bit firmer and denser than the BB, though nothing at all like the other pink sponge. Mind you, I have been using the BB for over a year, and I can't remember if it felt denser when it was brand new.

In terms of actual use, the Beauty Blender and L'Oréal Foundation Blender perform similarly. When I use them dry, the BB seems slightly more absorbent, which helps to pick up any excess oiliness left behind by my concealer, but the L'Oréal sponge is not far behind. The main difference is the shape. The narrow tip of the BB is easier to use in the corners of my eyes and next to my nose, but if I pinch the tip of the L'Oréal sponge when I use it in those areas, the difference isn't an important one for me.

Used wet for foundation, the L'Oréal sponge (left below) blends out and sheers the product a bit more, which I like. But if you want a more opaque base without building it up, you might prefer the Beauty Blender (right below). (It's possible that this distinction is due to my BB being older and more worn. I can't be completely sure.)

Comparison swatches of L'Oréal Blend Artist Foundation Blender Sponge and Beauty Blender

Above: the same foundation applied with the wet L'Oréal Foundation Blender (left) and the wet Beauty Blender (right).

Oddly enough, the packaging for the L'Oréal blender doesn't mention using it wet, but it's clearly designed to be used that way, since it's made to expand and soften up just like a Beauty Blender. I wonder if that's some kind of trademark/patent thing.

L'Oréal Blend Artist Foundation Blender Sponge

One of the biggest benefits of the L'Oréal blender, in my opinion, it that it doesn't bleed pink dye the first half dozen times you wet it. (Yes, you can get other colors of Beauty Blenders, I know.)

I'm satisfied to fully recommend the L'Oréal Blend Artist Foundation Blender as a more affordable alternative to the Beauty Blender. To answer the question posed by my title, however, it's not a dupe due to the difference in shape and the sheerer application I got from it. But I am not a stickler for things being exact dupes. I'm curious about the other L'Oréal shapes, though I probably don't need additional sponges taking up space just for the sake of novelty.

By the way, Beauty Blender sells a special liquid cleanser for their sponges that works well. It's just castile soap, though, so instead of paying $18 for 5 oz., you can get 32 oz. of Dr. Bronner's for $16. (I haven't tried the BB bar soap, but I can't imagine it's anything miraculous either. Correct me if I'm wrong.)

Any Beauty Blender devotees out there, or do you use a cheaper option? I've heard mixed things about the Real Techniques sponges, though I think they can sometimes be found for slightly less.

Monday, April 17, 2017

Swatch-o-rama: Laura Mercier Eye Art Artist's Palette Comparisons

Affiliate Links

Laura Mercier Eye Art Artist's Palette

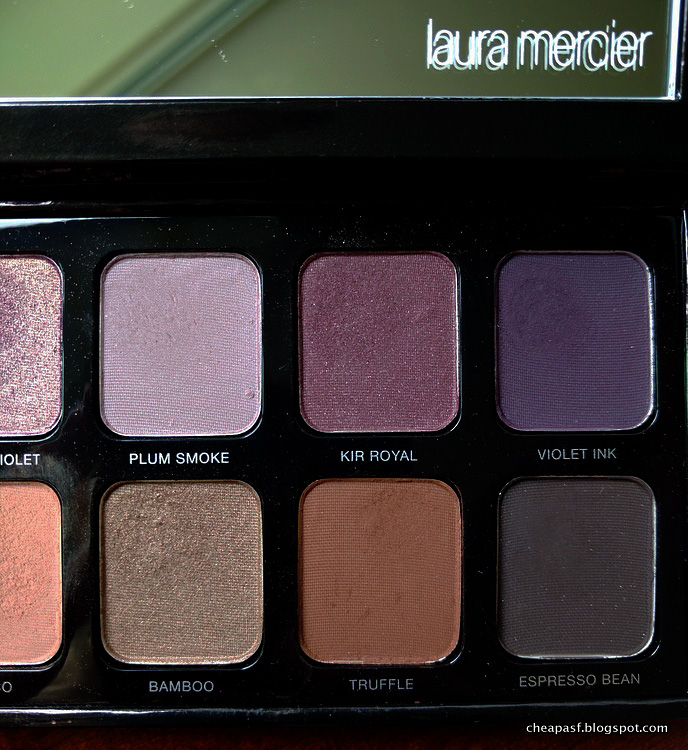
I had the Laura Mercier Artists' Eyes Arty Art Eye Eye Art Artist's Palette on my Christmas list last year mainly because I loved Plum Smoke, which works as an easy, warm neutral on me (and is a pretty good dupe for the horrendous Maybelline Color Tattoo in Vintage Plum, reviewed here). The single is $25, while this whole palette is $55 ETA: Now half price at Nordstrom Rack. Since I'm not likely to get through any powder eyeshadow ever, and the other colors in this palette looked pretty too, I figured the palette was the better way to go (at least when I was imaginarily spending someone else's money).

My mother-in-law generously obliged--except she bought me the Eye Art Caviar Palette, an understandable mistake, since the names are not very descriptive or distinctive. Luckily I was able to exchange it without any problem, and so here I am with this dreamy, purpley palette that's unlike anything I already had (in contrast to the the bronzey Caviar palette). It's flattering and versatile for my coloring, and though I wouldn't say it's so amazing as to be worth a small fortune, it doesn't feel like it's exorbitantly overpriced for what you get. As you'll see from the swatches below, though, this isn't your trendy, super-pigmented eyeshadow palette. Most of the shadows, especially the light and medium shades, apply fairly sheerly, though they can be built up without trouble. I'd say that the most disappointing shade is African Violet, because it looks stunning the pan. It tends to stay on the sheer side on my eyelids, and the gold shimmer doesn't show up much. I haven't tried it over glitter primer yet, though, and it's possible that would help, like it has with other shimmery eyeshadows that don't contain actual glitter.

Here are some closer views of the pans:

Laura Mercier Eye Art Artist's Palette

Laura Mercier Eye Art Artist's Palette

The main reason I decided to write a post about this palette is that I wanted to compare some of the shadows to others that I already had, particularly those in the Covergirl TruNaked Roses palette (reviewed here), so I'll share those swatches with you, along with some other comparisons. It turns out that I don't seem to have dupes for the more interesting colors here, which makes this palette a nice addition to my outrageous makeup hoard.

First, here are swatches of all the shadows in the Laura Mercier Eye Art Artist's Palette. All the swatches in this post were done over Wet N Wild primer (reviewed here), because I wanted everything to stick well enough that I could clearly compare colors.

Swatches of Laura Mercier Eye Art Artist's Palette: (1) Sparkling Dew, (2) Guava, (3), African Violet, (4) Plum Smoke, (5) Kir Royale, and (6) Violet Ink.

(1) Sparkling Dew, (2) Guava, (3), African Violet, (4) Plum Smoke, (5) Kir Royale, and (6) Violet Ink.

The top row contains most of the pinks and purples. The first three shades are a little sheer but, as I said, they can be built up, and Sparkling Dew and Guava seem invisible mainly because of how similar they are to my skin.

Swatches of Laura Mercier Eye Art Artist's Palette: (1) Vanilla Nuts, (2) Primrose, (3) Fresco, (4) Bamboo, (5) Truffle, and (6) Espresso Bean.

(1) Vanilla Nuts, (2) Primrose, (3) Fresco, (4) Bamboo, (5) Truffle, and (6) Espresso Bean.

The bottom row has the peaches and browns. Again, the peculiarly-named Vanilla Nuts is decently pigmented, but too close to my skin tone to show up well on my arm.

Below are some comparisons swatches I made. I only compared the shades that I thought were more interesting, which means I skipped the lightest two shadows (also because you wouldn't be able to see anything) and the darkest browns. I didn't find anything comparable to the two darkest purples (yay me), so they haven't been included either.

First up, the shimmery pinks/rose golds:

Swatches of (1) Laura Mercier Guava, (2) Laura Mercier Primrose, (3) Covergirl Roses Champagne, (4) Covergirl Roses Rose Gold, (5) Wet N Wild Silent Treatment Trio, (6) theBalm Cindy-Lou Manizer, (7)  e.l.f. Enchanted, and (7) Urban Decay Fireball.

(1) Laura Mercier Guava, (2) Laura Mercier Primrose, (3) Covergirl Roses Champagne, (4) Covergirl Roses Rose Gold, (5) Wet N Wild Silent Treatment Trio (browbone shade), (6) theBalm Cindy-Lou Manizer, (7)  e.l.f. Enchanted (reviewed here and here), and (7) Urban Decay Fireball.

No dupes for me!

Swatches of (1) Laura Mercier African Violet, and (2) purple from Paula's Choice Four Mattes and a Glam.

(1) Laura Mercier African Violet, and (2) purple from Paula's Choice Four Mattes and a Glam.

You can see here what African Violet looks like when it's built up a bit more. The Paula's Choice purple with gold shimmer looks almost pink in comparison, but it's definitely purple in its pan.

Swatches of (1) Laura Mercier Fresco, (2) medium warm brown from Juvia's Place Nubian Palette, and (3) Wet N Wild Comfort Zone palette (brown eyelid shade).

(1) Laura Mercier Fresco, (2) medium warm brown from Juvia's Place Nubian Palette, and (3) Wet N Wild Comfort Zone palette (brown eyelid shade).

Fresco is an awesome, unusual color. Depending on the lighting, it can look peachy or rosey, or taupey or clayish. I didn't have anything remotely like it.

Swatches of (1) Laura Mercier Plum Smoke, (2) Makeup Geek Fairytale, and (3) Covergirl Roses Copper Rose.

(1) Laura Mercier Plum Smoke, (2) Makeup Geek Fairytale (reviewed here), and (3) Covergirl Roses Copper Rose.

Plum Smoke, my favorite shadow from the palette, looks absolutely purple in the palette, but next to Fairytale, you can see where its name comes from. The warm taupe in it makes it both smokey and plummy. It's another unusual shade.

Swatches of (1) Laura Mercier Bamboo, (2) Maybelline Color Tattoo in Bad to the Bronze, (3) BareMinerals A-ha, and (4) Wet N Wild Nutty.

(1) Laura Mercier Bamboo, (2) Maybelline Color Tattoo in Bad to the Bronze (reviewed here), (3) BareMinerals A-ha, and (4) Wet N Wild Nutty.

Bamboo, unlike the others, is not unique. Bad to the Bronze looks a lot different in a swatch, but that's mainly because it's a cream that I applied with my finger. I find that all of these look very similar on my eyelids, though Bad to the Bronze can be intensified more easily. (The smearing is from Nutty, which is a bit messy, like most Wet N Wild shadows.)

This exercise was very useful for me in the end! Despite the repeated layers of primer all over my arms and the resulting dryness. It confirms that the Laura Mercier Eye Art Artist's Palette has, if not completely unique colors, a lot of shades that are unusual not duplicated in my unnecessarily large collection of eyeshadows. I've got a lot of use out of the palette already, and it's not something that I expect to get sick of in the future. The name is pretty stupid, though.

Related Posts Plugin for WordPress, Blogger...