Disclosure: Affiliate links. Provided free for review.
When I saw the first reviews of the
Bite Multisticks, my initial thought was that they weren't for me. I've never had particularly good luck with multi-use products. When something is intended to be used on both lips and cheeks, it tends to be either too drying on the lips or too hard to blend on the cheeks. I think this is the first time I have encountered a product designed for use on lips, cheeks,
and eyes, which is even a taller order.
Of course, as soon as I dismissed the product, Influenster promptly sent me three--
Blondie, Cocoa, and
Macaroon (yes, it is spelled that way)
--to test and review. Okay. A challenge! My thought was that these Multisticks would be ideal for travel. Not only would a single product that you could use on eyes, lips, and cheeks make for some very compact packing, but also when I travel, I like to pack as few brushes as possible, so I like cream products that can be applied with fingers. What is especially nice about the Bite Multisticks is that they have study magnetic lids. You don't even have to push the cap all the way on. Just slide it part way, let go, and it snaps right in place. That would be great for ensuring that it wouldn't come open in your bag and make a mess.
Unfortunately, these sticks fit in with my general experience of multi-use makeup. They work okay for each purpose, but they aren't spectacular for any of them. While I like the idea of getting several uses out of a single item, it's pretty rare.
Bite describes these sticks as having "35 percent powder," which . . . . okay, sure. But they do have a different texture from most matte lipsticks, and describing it as more powdery seems accurate enough. Unlike some of the other Bite lipsticks, these sticks are not scented.
When I tested the Multisticks, I applied them all using just the stick itself with my fingers to blend, going along with my idea that they would be best suited to travel. Indeed, this is the best method I've found for application. Trying to apply them with a brush makes them very sheer and patchy. Unfortunately the shape of the stick makes it a bit tricky to apply to the eyelid, but it's still the best method if you want as much saturation and opacity as possible.
The colors I received are interesting, but unfortunately none of them quite works on all three of my features.
Blondie is a beige with more yellow-brown than peach in it, which just doesn't work well as lipstick or blush with my coloring, though it's quite nice on my eyes.
Cocoa is a dark brown that is basically a much deeper version of
Blondie, i.e. more yellow than red in the brown. It's too dark for my cheeks, and while I can wear it on my lips, it's not a look I would choose. So that's limited to just eyeshadow too.
Macaroon is a nice, rosy pink. It's not the perfect pink lipstick for me, but it's wearable, and it makes a nice blush. I also tried it as eyeshadow, (photos later in the post) and while it wasn't as terrible as I'd expected, I doubt that it's something I'll wear on a regular basis. I've been following
Temptalia's swatches of the different shades as they appear, looking for one that I think I could truly use for all three things (lips, cheeks, eyes), and the only one that seems likely is the purple
Nectar, which would make an unusual but maybe interesting blush. The rest seem either too brown for my lips or too pink/red for my eyes. For those of you who can really pull of brown lipstick or pink/red eyeshadow, however, there are a lot of options!
Swatches and photos. Let's start with
Blondie. I compared it with the closest products I had, and you can see that it's really true beige, rather than being peachy like most other brown/beige/nude products I have.
Left to right above:
Bite Multistick in Blondie,
Maybelline Color Sensational Lipstick in Maple Kiss, ModelCo Party Proof Lipstick in Kitty, and
Milani Shadow Eyez Pencil in Almond Cream.
On my lips:
I had no real complaints about the application or wear of
Blondie as a lipstick. It's easy to apply in one opaque layer, though the blunt stick isn't the easiest to use precisely. It was comfortable and not drying, despite the "35 percent powder" content. It's just the color that I don't like on me.
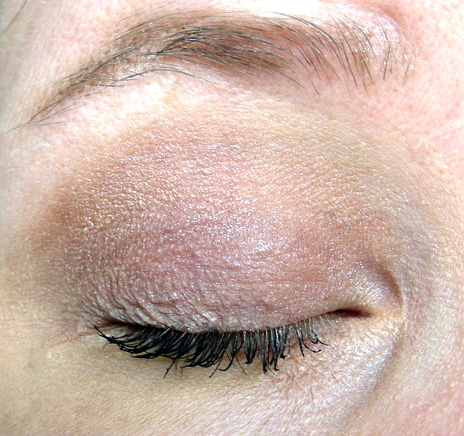
On my eyes:
This I liked better than I expected to. It's subtle, but pretty. It did crease after a few hours (over primer), but it's light enough that it wasn't too noticeable.
I found that of the three shades I received,
Blondie is the least slippery, with means it doesn't settle into lines on lips easily and it doesn't crease as badly as the others on my eyelids. That also means, however, that it's more difficult to blend as a blush. It's actually a very good color for a bronzer on me, but I found it nearly impossible to blends smoothly enough to not look patchy. I'll stick with powder bronzers on the rare occasions that I use them.
Next up,
Macaroon. One of the thing Bite advertises for the Multisticks is that you can use them to create a monochromatic look, which is cool in theory, but as I said, you have to be able to use one color all over your face.
Macaroon was my best bet, so I gave it a shot.
Like I said, it wasn't as bad as I'd expected, but that's a bit too much pink for me.
Macaroon has the most slip, so it blends beautifully as a blush, but the slipperiness also causes
Macaroon to settle into lip lines a bit. On the other hand, it is a comfortable and quite long-wearing matte lipstick.
On the lips:
On the eyes:
Here are some comparisons with
Macaroon. It's very, very close to Tom Ford
Pussycat, if you've been looking for a cheaper dupe.
Left to right above:
Bite Multistick in Macaroon,
Maybelline Creamy Matte in Lust for Blush, Maybelline Creamy Matte in Touch of Spice,
Wet N Wild Megalast Lipstick in Rose-bud,
Urban Decay Revolution Lipstick in Rapture, L'Oreal La Laque in Choco-laque, and
Tom Ford Pussycat.
And finally,
Cocoa, which only works as an eyeshadow on me. It's definitely brown! I don't have any comparable lipsticks at all.
Left to right above:
Bite Multistick in Cocoa,
Milani Shadow Eyez Pencil in Cafe au Lait, and
Maybelline Creamy Matte in Divine Wine.
On my lips:
It applied nicely and wears well. It's just not a great color for me.
On my eyes (the photos were taken within minutes of applying it, over primer, so you can see that the creasing is pretty immediate):
Despite the creasing and patchiness, I did like how it looked when applied from the stick and blended with a finger. It reminded me that I should use a wash of dark, matte brown more often as a simple eyeshadow look.
Cocoa also works very well as a cream base to intensify powder eyeshadows. When used that way (over primer) it doesn't crease at all. But I wouldn't buy a $24 product solely to use as a base for other shadows, especially since I still have to use a primer.
Unfortunately, none of these three shades is really a triple-threat for me. I think if you can find a shade that works that way for you, then you can get a lipstick, blush/contour, and cream eyeshadow base from it. But since it needs to be topped with powder eyeshadow, it's not a perfect travel product that eliminates the need to pack additional eyeshadow and brushes. In the end, I found the Multisticks fun to experiment with and better than I'd hoped (especially as a lipstick formula), but they're certainly not going to replace dedicated eyeshadows, blushes, or lipsticks in my hoard.
I am thinking that
a combination of
Cocoa and
Blondie could be used to make a pretty great sepia Halloween costume, though . . .
Have you ever found a multi-use product that actually excelled at multiple things? Any interest in the
Bite Multisticks? Is there a color there that you could use for that cool, grungy monochromatic look?
(By the way, I got these from
Influenster. Anyone can sign up--it's not a blogger thing, though you do need to use social media.)


 Wet N Wild Fergie Eyeshadow Primer")