Sunday, February 25, 2018

Could be grosser: Review of Tony Moly Changing U Magic Foot Peeling Shoes

Affiliate Links

Review of Tony Moly Changing U Magic Foot Peeling Shoes

After three months of Texas living, the majority of which time I spent in sandals, my feet were rough. I call them velcro feet when my soles are so scratchy that they stick to my socks and bedsheets. Shudder. Usually O'Keeffe's Healthy Feet (reviewed here) is enough to keep my feet soft, but this was beyond.

I considered buying the classic Baby Foot for a short time, until I noticed Tony Moly's version at Ulta for a fraction of the price. The reviews were similar, but I could get two packs of the Tony Moly Changing U Magic Foot Peeling Shoes for less than one Baby Foot. (The cheapest place I've seen Changing U Magic Foot is Hollar for $4.) Since my husband's feet were gross too, we both decided to try these out. The back of the envelope states that the product will, "transform an average-looking woman into an attractive lady," but I'm not sure either of us achieved that lofty goal, much to our mutual dismay.

Review of Tony Moly Changing U Magic Foot Peeling Shoes

Here's the full back of the envelope:

Review of Tony Moly Changing U Magic Foot Peeling Shoes

The packaging doesn't show the full list of ingredients in English, so here they are:
Alcohol, Water, Propylene Glycol, Lactic Acid, Urea, Glycolic Acid, Betaine, Isopropyl Alcohol, PEG-60 Hydrogenated Castor Oil, Hydroxyethylcellulose, Salicylic Acid, Hydroxypropylcellulose,Tocopheryl Acetate, Allantoin,Disodium EDTA, Menthol, Onsen-Sui, Nelumbium Speciosum Flower Extract, Rosa Canina Fruit Oil, Aloe Barbadensis Leaf Extract, Althaea Rosea Root Extract, Pyrus Malus (Apple) Fruit Extract, Citrus Limon (Lemon) Fruit Extract, Vitis Vinifera (Grape) Fruit Extract, Scutellaria Baicalensis Root Extract, Honey Extract, Ginkgo Biloba Nut Extract, Angelica Gigas Root Extract, Paeonia Lactiflora Bark / Sap Extract, Zizyphus Jujuba Fruit Extract, Laminaria Japonica Extract, Punica Granatum Fruit Extract, Glycyrrhiza Glabra (Licorice) Root Extract, Artemisia Vulgaris Extract, Yeast Extract, Fragrance.
As you can see, the main active ingredients are a mix of AHAs and BHA in high concentration, aided by a number of other ingredients, some of which may have a soothing effect, depending on how much is in there. There's also a lot of alcohol, which can be drying (and definitely was, in my case).

Here's what's inside:

Review of Tony Moly Changing U Magic Foot Peeling Shoes

You get two booties, plastic bags with fabric soaked in the solution lining them. They're sealed at the top, and you peel them open, side your foot in, and use the stickers to hold them in place.

Review of Tony Moly Changing U Magic Foot Peeling Shoes

I wear size 10.5 shoes, and my husband's feet are bigger, and neither of us had any trouble fitting these on. They feel a little cold and slimy, but I didn't notice any tingling or other sensations while I was wearing them. The instructions say to keep them on for 1 to 1.5 hours, and I went with the longer time. It was possible to walk with the bags on my feet, but not exactly pleasant, so I wouldn't recommend it. They're pretty slippery. After a couple of episodes of whatever it was I was watching at the time, I made my way carefully to the bathtub, took off the booties, and thoroughly rinsed my feet in warm water.

There was no immediately noticeable effect, but by the next morning my feet felt really dry. By the second day they started to look even more scaly than they had been, but they didn't start to peel yet. According to the instructions, they will begin peeling in 4-6 days, and the process will be complete in two weeks. The skin on my feet felt dry to the point of slight discomfort for the first several days, maybe because there's so much alcohol in these things in addition to the acids. I had to lotion them a few times.

Here's the part where I show you nasty foot photos. If you're not here for that, just close your eyes and scroll to the end for my final assessment. (And if you got here from a strange google search and you're going to get weird with it . . . um, at least click my affiliate links?)

Wednesday, February 14, 2018

Concealing Redness with Yellow Corrector: Comparison of Urban Decay Color Correcting Fluid and L.A. Girl HD Pro Conceal

Affiliate Links

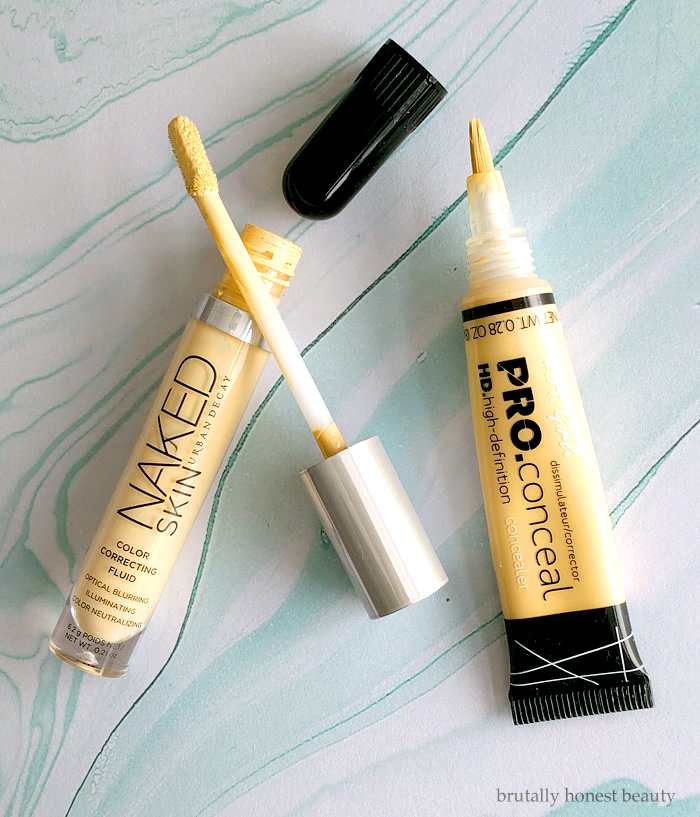
Urban Decay Color Correcting Fluid vs. L.A. Girl HD Pro Conceal in Yellow

On a daily basis, I don't tend to wear a full face of foundation or other base product. Some days I'll feel ambitious enough to slap on some tinted moisturizer, but it's rare that I use a fuller coverage foundation. Still, I have a significant amount of redness in my skin, especially in the center of my face, concentrated on either side of my nose. I've also been breaking out a lot lately, and that adds to the redness on my chin and forehead between my eyes. I want that shit to be less obvious.

Rather than covering my face with a uniform layer of product, my preferred camouflage is color corrector in the red areas, a liquid concealer under my eyes, and spot concealing for blemishes. Then I set everything with a loose powder, and I'm good to go. It probably takes nearly as much time for this routine as it would to use an opaque foundation, but for me, this is an easier, lower maintenance process. I also tend to like how my makeup looks by the end of the day. I've tried many foundations and I never really like how they wear, though some are better than others. Finally, I just don't love the feeling of foundation on my skin, and I get self-conscious about whether or not I'm rubbing it off somehow. So foundation is something that I tend to only use occasionally.

I've written about using the Urban Decay Naked Skin Color Correcting Fluid to conceal redness before (here). For whatever reason, yellow color correctors, as far as I've seen, are never advertised as targeting redness. In fact, I've never even seen anyone write a blog or Instagram post (etc.) saying that they use yellow corrector for this purpose. But I am here to tell you that if you haven't had good luck trying to cancel out redness with a green color corrector, it's worth giving yellow a shot instead. For me, green correctors tend to add a greyish cast to my skin, while yellow simply disguises the redness. You can see a comparison in my previous post of the subject, where I go into more detail about why I think this works.

(Yellow correctors are usually aimed at improving "brightness," but it's not clear to me exactly what problem this is correcting. If you use yellow for brightness, I'd love to hear about what it does for you.)

What I really want to do here is compare the Urban Decay yellow corrector, which contains 0.21 oz. of product for $28, with L.A. Girl HD Pro Conceal in Yellow, which contains 0.28 oz. for about $3-4 (depending where you buy it). I don't think I need to do any math for you to see the massive value difference there, so I had high hopes that the L.A. Girl option would be a functional substitute, since I use this corrector so much that I go through it very quickly. I'm not eager to drop another $28 on such a small product if I can avoid it.

Swatching the two yellow correctors, you can see some subtle differences. The Urban Decay corrector has a more opaque, whitish base, and the L.A. Girl corrector is slightly more translucent and lacks that white base. I'm not sure these differences are strong enough even to be visible in my photo, but they are detectable in person. Urban Decay on the left; L.A. Girl on the right.

Swatches of Urban Decay Color Correcting Fluid vs. L.A. Girl HD Pro Conceal in Yellow

Here's my bare face right now--as I said, I've been breaking out worse than usual for the past couple of months. I'm working on controlling that, but in the meantime, I'd like to disguise it.


You can see that the redness is concentrated on either side of my nose, but also between my eyebrows, and on my upper lip and chin. I also have mega dark circles that are reddish-purple.

Below I've applied the Urban Decay corrector on the left side of the photo, and the L.A. Girl on the right side of the photo. I've only used it over those red areas mentioned above. (I also put on mascara and brow pencil, as you can tell, because my face hairs are no longer completely invisible.)


I think you can see, despite the mediocre indoor lighting, that it works really well to conceal redness in a natural way on my skin. Can you see any differences between the right and left sides of my face? Personally, I can't see any in the photo, and I couldn't see any in person either. Any visible differences are just because the blemishes in my skin aren't perfectly symmetrical.

Here are closeups of each side so that you can see what the texture looks like on my skin. Again, I don't see any real difference. Both products have a slight tendency to highlight flakiness, but not dramatically, and not to the extent that I'm bothered by it.

Urban Decay:


L.A. Girl:


In these photos, I've used the corrector under my eyes, as well as on other red areas. For everyday use, I skip adding it to my eye area and just use my usual Sephora concealer (reviewed here), which has a slight yellow tint to it. I don't find that layering a yellow corrector under concealer in that area makes a big enough difference to be worth the extra work. I do, however, pat the extra Sephora concealer that's on my fingers after I blend it under my eyes on to the skin next to my nose. Then I spot conceal pimples with Urban Decay 24/7 Concealer Pencil, which seems, unfortunately, to have been discontinued. Finally, I set everything with loose powder.

Here's the final result with all my makeup (hey hey hooded eyelids!):


I like the results. As for other points of comparison between the Urban Decay and L.A. Girl correctors, the biggest difference is the packaging. The Urban Decay packaging is prettier, yes, but I also prefer it in terms of function.

Urban Decay Color Correcting Fluid and L.A. Girl HD Pro Conceal in yellow review

I apply my concealer/corrector with a flat concealer brush (I have this stupidly expensive Clé de Peau brush that I got for free, but anything similar should work). I'd much rather just pick up the product from the UD doefoot than squeeze it out of the L.A. tube into its stupid brush tip. It's harder to control how much comes out of the squeeze tube. I suppose it might be easier to use up the last dregs of the product left in the squeeze tube at the end of its life, however.

In terms of wear time, they're about the same for me. It's not all left at the end of the day, but my face is still less red than it would otherwise be, and the makeup doesn't look cakey or weird.

Overall, since most things are about equal, I'd certainly recommend the L.A. Girl yellow concealer. It's cheap enough that even if you want to just experiment and figure out if yellow corrector will do anything for you at all, you won't be taking much of a risk. But I don't think there's a real advantage to the Urban Decay option, anyway. The slightly more translucent base of the L.A. Girl product also makes me think that it would work better on darker skin than the whitish Urban Decay corrector--though there is probably a limit, because it is still a light yellow.

I was seriously surprised by how well this L.A. Girl HD Pro Conceal corrector worked for me, considering that I had tried one of their regular concealers in the past, and wasn't impressed (reviewed here). But for a product like this that isn't supposed to match skin tone and isn't supposed to create a totally opaque concealing layer, it's fantastic.

Is there seriously no one else out there who uses yellow to cover redness? Hello? Anyone?

Tuesday, February 6, 2018

Texas Empties

Affiliate Links


I've probably mentioned this a bunch of times already, so forgive me for repeating myself. In September, I moved from the midwest to Texas for a new job. Then at the beginning of September, I moved from Texas to L.A. (for the same job). My husband and I drove across country, and since it's only a year-long gig, we just took with us what we could fit in our car. I ended up finishing a lot of products while I was in Texas, which was great, because every little square inch of space counted on the next leg of our move. You know how things never seem to take up the same amount of space when you pack them a second time?

So here's an empties post, without the most inspiring photography, I'm afraid. But there are thematic stars for Texas! At first I divided my garbage into makeup, skincare, and haircare, but then I finished more shit in the last couple of days before the move, so that organization didn't hold up. I didn't save foils, bath/body products, or shampoos and conditioners, though I actually used up a number of those as well.

Starting with the photo above, beginning from the top left:

Laura Mercier Translucent Loose Setting PowderReviewed here. I do like this powder a lot, but it's quite expensive, so I'm not sure I'd buy it again. This mini jar was actually a gift. I think it lasted the better part of a year.

Urban Decay Optical Illusion Primer (deluxe sample): I like this primer quite a bit--enough to crack it open and scrape out the inside. It does blur and reflect light and all that. The texture is a bit heavy and slick feeling, though. I have another sample I'm working on, and then I might buy a tube. (I've mentioned before that this has been the weird year of Urban Decay for me, and this is another of their products that I got into.) Interestingly enough, the mini size is actually a better value!

Maybelline The Colossal Cat Eyes Mascara: I bought a handful of Maybelline mascaras last year, because Amazon had them for less than $3 a piece. Maybelline mascaras always flake on me. This was no exception. Otherwise it was a decent mascara, but the flaking drove me crazy, and I tossed it before it was even close to finished.

Buxom Lash Mascara (mini): This mascara came from one of those Sephora Favorites sets. It was great, except it has one of those fucking enormous brushes that it seems like every new mascara has, and I have small eyes, so I have a hard time getting at the small lashes in the corners. I also tend to stab myself with big mascara brushes. Don't forget about us beady-eyed folks, makeup gods!

IT Cosmetics Superhero Mascara (mini): From the same Sephora kit. I don't have any particular memories of this mascara, which I will interpret to mean it was unremarkable and not that I am losing my mind.

Shiseido eyebrow pencil sample: I don't remember the shade name, but I got the sample from Choix before they imploded. It was fine, but the plastic thing on the end prevented further sharpening, even though there was SO MUCH LEFT. (Yes, I tried to pry it off. Of course I did!)


Again, from the top left corner above (i.e. a shitload of Paula's Choice):

Paula's Choice 2% BHA: Briefly reviewed here. Maybe I should write a dedicated post about this stuff some day, since I've been using it for over a decade. Or have you heard all you care to about it? I immediately opened another bottle, and I have another backup waiting.

Paula's Choice Omega+ Complex: I loved this. It calmed the redness in my skin like nothing else and functioned as a light moisturizer in the Texas humidity. Now that I'm not riding the Paula's Choice referral credits gravy train anymore, though, I'm balking at the price. Maybe I'll replace it once I've finished every other hydrating serum I have.

Paula's Choice Calm Redness Relief Serum: It's ok. It's hydrating and kind of soothing. It doesn't work for me the way the Omega+ serum did. I'm actually working on a second bottle of it right now, though, because I panicked when my Paula's Choice credits were about to expire and ordered another one.

Paula's Choice Super Antioxidant Concentrate Serum: I almost finished this tube, but not quite, and decided to just chuck it before the move. I didn't notice any results from it, and it had that thick, greasy silicone texture (not the matte, powdery silicone texture) that I don't like. Maybe the antioxidants prevented bad things from happening to my face that would have happened otherwise. Who knows.

L'Oréal Revitalift Triple Power Moisturizer: I got this stuff for free from Influenster (who haven't sent me anything since last July--I wonder if it's because I didn't positively review the last few thigns they sent?). I didn't like it at all. It was too heavy for my skin and very obnoxiously fragranced. I ended up using it up as a hand cream.

Paula's Choice 10% Niacinamide Booster: Mentioned here. It's great, and I'm using another bottle now, but I might get my niacinamide from a less expensive source when I finish that one.

The Ordinary Buffet: I still plan to review this, even though I finished it a while ago. I should get on that. I'll just say that it was good, but I wouldn't buy it again. I've used moisturizing serums that I liked better, and it didn't get along with my silicone-based sunscreen.

Paula's Choice Moisture Gel: Reviewed briefly here. This is another product that has been one of my favorites for at least a decade, but now (say it with me) is too much for my budget, so I haven't replaced it.


I'm not really a hair person, so I'll do something different here (and let me know if you have any questions).

LOVED: Batiste dry shampoos (reviewed here).

LIKED A LOT: L'Oréal Extraordinary Oil Serum (reviewed here).

LIKED A BIT: Klorane dry shampoo and No. 4 detangling spray.

HATED: OUAI dry shampoo foam.

And here are the miscellaneous other things I finished after taking the photos above, but before actually moving.


The John Frieda Frizz Ease serum is a bit of a cheat, because I mixed the little bit I had left with another hair serum. The Expert Finish formula was too heavy for me--better suited to thicker hair, I think.

The Paula's Choice Resist Clear Skin Hydrator was a barely moisturizing moisturizer for people who barely need moisturizing, I guess.

The Origins GinZing scrub was another freebie from Influenster, and it was ok. My husband actually used most of it, because he likes a scrub more than I do, but I'm still taking credit for it here, apparently.


Oh look, I did include a body product in here! That's because I had this Suave lotion for at least a couple of years, so it was a real triumph to finally finish it. One of the reasons it took so long to get through is that I'd made it into a sort of moisturizing swamp water. Any time I had a sample or small container of a moisturizer or serum, etc., that I didn't like to use on my face, I emptied it into this bottle. The fragrance of the Suave lotion overpowered everything else, and I got some use out of crap I didn't want that way. Anyone else do something like that?

The Paula's Choice eye cream seemed pointless to me, so I used that little sample as a hand cream.

I got this Lancôme Creme Douceur cleanser as compensation for doing a consumer study. It was a little drying, so I didn't use it more than once a week. It lasted forever.

On to California! Palm tree emoji!

Saturday, February 3, 2018

Plummy bronze: Urban Decay Vice Lipstick in Accident and Urban Decay Revolution Lip Gloss in Shadowheart

Affiliate Links


Can you tell I couldn't come up with a good title? Titles are always the hardest part of any writing. In general, though, I've been struggling a bit with motivation/inspiration to blog lately, even though I've been fully enjoying my beauty products. I think I've figured something out. I usually have some kind of angle to my posts, like a comparison or an analysis, you know? At the very least I'm trying to write about whether or not something is worth buying. But right now I have a lot of products that I haven't written about, but that don't exactly have a hook. So I've been feeling like I have nothing to write about, even though I actually have a ton of shit. It's not that these products aren't interesting; it's just that they aren't gimmicky or controversial, etc. But I'm just going to go ahead and write about them anyway. Why not? We'll look at some pretty (I hope) pictures together and think about makeup and skincare. I definitely still have some of my old tricks up my sleeve, but I'm also going to work my way through my hoard and show you all the things. Does that sound cool?

I'm starting with a lipstick I bought in the fall, Urban Decay Vice Accident, and a gloss I bought earlier in the winter, Urban Decay Revolution Shadowheart. They're an obvious pairing since they're almost exactly the same color in two different formulas and finishes (obviously). Shadowheart has been discontinued, along with the rest of the Revolution glosses, but you may still be able to get it for $11 on Urban Decay's site, which is where I got this tube. It's also been included in their new lip gloss formula, which isn't available yet.

(Side note: It looks like Urban Decay changed their loyalty program so that you don't get free shipping until the second tier, which is too bad. But if you're going to shop from their site anyway, I think it's still worth joining to get the birthday gift, etc. This is my referral link, which gives you 10 points.)

Accident is one of the metallized Vice lipsticks, with a plummy brown base and gold shimmer. The brown is on the neutral side (is neutral a side?), but it will probably look different depending on your natural lip color, since it's just a little sheer. Shadowheart looks a bit redder in the tube, but is also a brown base with gold shimmer, though not nearly as metallic as Accident.

Why did I buy a gloss the same color as a lipstick I already had? I DON'T KNOW.

Here, swatches! Accident on the left, Shadowheart on the right.

Swatches of Urban Decay Vice Lipstick in Accident and Urban Decay Revolution Lip Gloss in Shadowheart

See how similar they are? Shadow heart has a little more red in it, but it's very close.

Swatches of Urban Decay Vice Lipstick in Accident and Urban Decay Revolution Lip Gloss in Shadowheart

It's interesting how Accident doesn't look very reflective in a swatch, like it does on the lips. Arm swatches can only tell you so much. Let me show you.

Here is Accident on my lips:


Like I said, it's a bit sheer, so I apply a layer, blot, and then apply a second layer. I haven't had any trouble with bleeding or settling into lip lines. The wear time is decent, and it doesn't look ugly as it wears off, though it's certainly not an unusually long-wearing lipstick. It's extremely comfortable, just like almost every Urban Decay lipstick I've tried. (The exception is Sheer F-Bomb, reviewed here.) It feels lovely--I'd go as far as to say it's a actually moisturizing.

Here's my whole face. (Excuse the terrible reflections on my glasses. I've yet to find the right lighting for selfies in this apartment. If I go out on the balcony, I end up squinting and frowning, but inside in front of a window this happens. I'm working on it. Maybe I should get Lasik for purely blogging purposes.)


I think that the pink in my lips enhances the plum in this lipstick a little, and those purplish undertones help it to be more flattering on me than a true brown lipstick would be. The gold shimmer gives Accident a glossy look as much as a metallic finish. It's a really fun and unusual lipstick, but totally wearable for pretty much any occasion. Here's another photo of it in warmer indoor lighting.

Shadowheart was a little disappointing, because it looks more shimmery and opaque in Temptalia's photos. I also have the Revolution gloss in After Dark, which is so opaque that it's almost a liquid lipstick, so I had high expectations.


In the photo above, I've applied a pretty heavy layer of Shadowheart, and you can see that it's still pretty sheer and a little patchy. It doesn't look bad from a distance, though (below). The gold shimmer is extremely understated. It's a nice gloss in a great color that I didn't have--it just doesn't have the impact of Accident. It is, however, just as comfortable and moisturizing as the lipstick.


See? A pretty gloss, for sure. Using Too Faced's Lip Insurance (reviewed here) helps a bit with the pigmentation, and Shadowheart also looks great layered on top of Accident.

As you can see, I've now fully embraced the brown lipstick life. I'm enjoying both of these, though if I had to choose, obviously I'd go with Accident. It's a really special lipstick in my overflowing collection. Shadowheart has been included in the new Urban Decay lip gloss selection, though, so maybe they've amped up the shimmer and pigment. Here's hoping!
Related Posts Plugin for WordPress, Blogger...